Showing posts with label frame. Show all posts

Sunday, June 28, 2020

Hello Summer Door Hanger

I'm back with another fun project to celebrate Summer... my favorite season!
I've shared quite a few of the wooden cutouts from Signopoly that make great door hangers or home decor. And, these sunglasses are super cute!
 I painted the frame with the color, Tree Frog Green. This is just a base because I did something fun with this color later on.
 If you've been here before, then you know that I love Dixie Belle Paint & use it for everything. It's intended for painting furniture, but the colors are so gorgeous that it's great for projects like this.
I painted an ocean sunset on the glasses...


 Then I added some palm trees...
 I made a vinyl stencil using my Cricut Maker to say, "hello summer." 
I added a yellow highlight to the letters.

 I added Dixie Belle's Crackle medium over the Tree Frog Green and let it sit overnight before adding a top color.
After letting the Crackle medium dry overnight, I painted over it with the color, Daisy.
 I used a Prima mould & modeling material to create a little flower embellishment for the corners of the glasses.
Hello Summer!!! Let the fun begin!


Linking To:

Sunday, April 28, 2019

Keep The Change

I love when I have the exact change to pay for things when I'm shopping. My husband, on the other hand, never spends his change. He always has a pocket full of coins. We put his coins in a jar & it can add up quickly to quite a large sum.
Here, I've created something prettier than the plastic jar we've been using.
Supplies:
Shadow Box
Scrapbook Paper
Scissors or Paper Cutter
Tacky Glue
Print Out Of “Keep the change”
Paint Pen
Tape
Utility Knife
 I took off the back of the shadow box and used a utility knife to cut out a notch at the top where I can insert the coins.

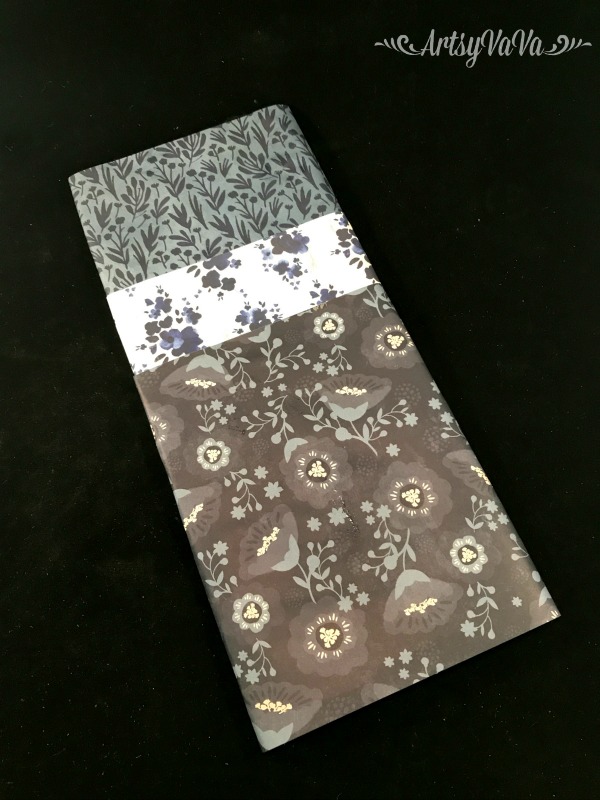
 I picked out 3 patterns of scrapbook paper and cut them to different sizes which will wrap around the back of the shadow box. Once I wrapped the paper around the backing, I secured it on the back with tape.


 I cut the paper around the notch to leave the opening.
 I printed out , Keep the change!, and taped to the inside of the glass. Then I traced over it with a paint pen.


 I put the back on and started filling the shadowbox with change.

 Once full, the shadowbox will hold approximately $200!
Unless, you have someone in your house who likes to steal the quarters!


Linking To:
Ginger Snap Crafts,  Rae Gun Ramblings, Chic On a Shoestring,  Simply Sweet Home, Have A Daily Cup Of Mrs Olson, The Cottage Market,  Funky Junk Interiors, DIY Showoff, Craft-O-Maniac, Keeping It Simple, I Should Be Mopping The Floor, The Dedicated House,  Sugar Bee Crafts, Flour Me With Love,  Today's Creative Blog, Tip Junkie,   I Gotta Create,   Domestically Speaking,  The Answer Is Chocolate, Skip To My Lou, The Thrifty Home, Flutter Buster, Nap Time Creations, The Foley Fam,  Finding Silver Pennies, A Stroll Thru Life, French Country Cottage,  Knick Of Time, Lou Lou Girls, Our Hopeful Home, My Thrift Store Addiction, The Painted Hinge, Savvy Southern Style,  Yesterday On Tuesday, Confessions Of A Plate Addict, My Uncommon Slice Of Suburbia, Dabbling And Decorating


Tuesday, August 14, 2018

Teamwork Makes The Artwork


We built our house 11 years ago and over the last few months, I've been in the process of starting to change things. I'm in the middle of a makeover in my formal dining room and I painted the furniture (there will be a post soon about that). Once I started painting the furniture, I decided that the brown walls had to go. The brown walls also went out into the foyer, so both rooms had to be painted. One thing leads to another so some of the artwork had to go too! I couldn't find anything that I liked for over my piano, so my son and daughter helped me make the perfect piece.

 I took a trip to my home improvement store and bought 1" x 6" boards, as well as 1" x 2" boards. My son cut the 1" x 6"s to the right length and I painted them with the color Fluff from the Dixie Belle Paint Company.

He cut the 1" x 2"s to frame out the 1" x 6"s and I stained them with VooDoo Gel Stain in the color Tobacco Road. I love the VooDoo stain because it's water based and the clean up is easy.
 Once I painted and stained the wood, my son used a nail gun to put them together.

 My daughter and I then added a Re*design With Prima image. 

 All you have to do is rub it on with the stick that is provided in the package.

 This has got to be the easiest artwork I've ever created. My son had the hard part, so he may not agree. And, it's perfect for my freshly painted walls!


 From what I have found (thank you Google) the translation from French to English is...
Drinking wine is an integral part of life as eating food.


Linking To:
Coastal Charm, Ginger Snap Crafts,  Creations By Kara,  Rae Gun Ramblings, Made In A Day, Chic On a Shoestring,  Simply Sweet Home, The Shabby Nest,  Somewhat Simple,   Live Laugh Rowe, Have A Daily Cup Of Mrs Olson, The Cottage Market,  Funky Junk Interiors, DIY Showoff, Craft-O-Maniac, Keeping It Simple, I Should Be Mopping The Floor, The Dedicated House,   Coastal Charm, Reasons To Skip The Housework, Sugar Bee Crafts,  Nifty Thrifty Things, Cherished Bliss, Mad In Crafts, Flour Me With Love, Not Just A Housewife,  Today's Creative Blog, Tip Junkie,  Homework,  I Gotta Create,   Domestically Speaking,  The Answer Is Chocolate, Skip To My Lou, The Thrifty Home,Cedar Hill Ranch, Flutter Buster, Nap Time Creations, Hope In Every Season, The Foley Fam, Our Home Away From Home,  Remodelaholic, Flamingo Toes,  Finding Silver Pennies, A Stroll Thru Life, French Country Cottage, The Scoop, Stone Gable, Knick Of Time, Lou Lou Girls, Our Hopeful Home, The Painted Hinge, Savvy Southern Style, Tattertots & Jello, Yesterday On Tuesday, Rachel Teodoro, Worthing Court, Confessions Of A Plate Addict, My Uncommon Slice Of Suburbia, Dabbling And Decorating


Tuesday, June 26, 2018

Two For One DIY

Today I'm sharing 2 DIY techniques in 1 post...
Crackle & Image Transfer.

 I started with a frame from Michael's...

 I applied Crackle from the Dixie Belle Paint Company directly onto the frame. This will allow the black to show through the cracks once I apply the paint. Crackle can be tricky. The key is to not overwork it. Don't brush back and forth!


 I let the Crackle dry completely, then painted over it with the Dixie Belle color, Apricot. It's the same when applying paint over crackle, don't overwork it! The paint starts to crack quickly so if you go back and forth over it, you will cover up the cracks.


I was originally going to do an image transfer on wood and add it to the frame, but decided to do it on the glass that came with the frame. I first gave the glass 2 coats of Slick Stick. It helps the paint stick to any really slick surface.

 You need to wait at least an hour between coats of Slick Stick. I also waited an hour before adding the paint color, Fluff. 

 I found a beautiful image of birds on the Graphics Fairy website, sized it to fit on the glass, then printed it out. I took it to my local office supply store and made copies on their laser printer. Ink jet images will bleed and you won't get a clear image. 

 I cut around the image, then added Dixie Belle Clear Coat to the printed side of the image, as well as to the glass.

 I pressed the paper, image side down onto the glass and let it sit overnight to ensure that it was completely dry before the next step.

 The next day I sprayed the paper with water and let it sit for a minute to soak into the paper.

 I then started to gently rub the paper. It will pull up but leave the image.

As it dries, the image may appear cloudy. If this happens, just spray with more water and continue the process.

If some of the image pulls up, it just adds to the vintage charm.

 I sealed the image with another coat of the Clear Coat, then added Van Dyke Glaze to the image on the glass and to the frame.


 I put the glass back in the frame and was so happy with it that I made 5 more!


Linking To:
Coastal Charm, Ginger Snap Crafts,  Creations By Kara,  Rae Gun Ramblings, Made In A Day, Chic On a Shoestring,  Simply Sweet Home, The Shabby Nest,  Somewhat Simple,   Live Laugh Rowe, Have A Daily Cup Of Mrs Olson, The Cottage Market,  Funky Junk Interiors, DIY Showoff, Craft-O-Maniac, Keeping It Simple, I Should Be Mopping The Floor, The Dedicated House,   Coastal Charm, Reasons To Skip The Housework, Sugar Bee Crafts,  Nifty Thrifty Things, Cherished Bliss, Mad In Crafts, Flour Me With Love, Not Just A Housewife,  Today's Creative Blog, Tip Junkie,  Homework,  I Gotta Create,   Domestically Speaking,  The Answer Is Chocolate, Skip To My Lou, The Thrifty Home,Cedar Hill Ranch, Flutter Buster, Nap Time Creations, Hope In Every Season, The Foley Fam, Our Home Away From Home,  Remodelaholic, Flamingo Toes,  VMG206,  Finding Silver Pennies, A Stroll Thru Life, French Country Cottage, The Scoop, Stone Gable, Knick Of Time, Lou Lou Girls, Our Hopeful Home, The Painted Hinge, Savvy Southern Style, Tattertots & Jello, Yesterday On Tuesday, Rachel Teodoro, Worthing Court, Confessions Of A Plate Addict, My Uncommon Slice Of Suburbia


Related Posts Plugin for WordPress, Blogger...