Tuesday, July 21, 2020

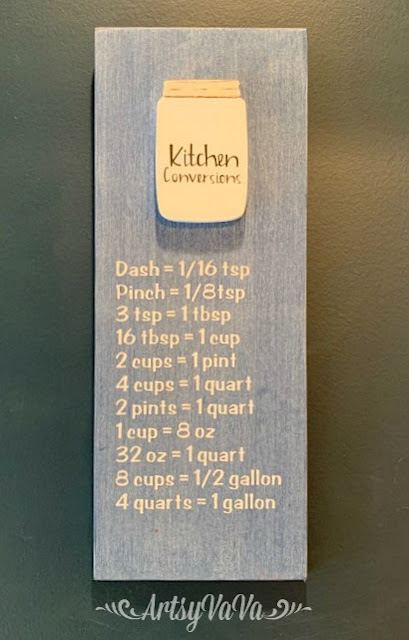
Kitchen Conversion Sign

Maybe you're better than me at keeping it all stored in your head, but sometimes I need a little help with kitchen conversions. Of course, I remember the basics, but ask me the size of a dash or how many pints are in a quart and I may have to look it up.
So, I made a cute sign to keep the basics within eye shot.

I first stained a board with Dixie Belle's Voodoo Gel Stain in the color Denim. 
The board I used is from Signopoly.

This stain is water based so the clean up is easy & there's no odor. And, you don't have to wear gloves! 
While the stain was drying, I painted a wooden cutout of a mason jar (also from Signopoly) with Dixie Belle's paint color, Haint Blue. I used Silver Bullet with a little black detail for the lid.
I made a vinyl stencil that reads, kitchen conversions, with my Cricut Maker, then used the color Caviar to paint over it.
 I made another stencil with the conversion chart. I placed it on the board then painted over it with Dixie Belle's Clear Coat & let that dry. This will help create a barrier to prevent the paint from bleeding under the stencil.
 My favorite thing to stencil with is a makeup sponge! I used the color, Haint Blue for the chart.

 I used E6000 to glue the jar onto the board.


 Now the basic conversions are within eye shot!


Linking To:

Tuesday, July 14, 2020

Less Is More

I found this beautiful china cabinet at a recent yard sale...
 It was in great shape & had some pretty detail. But, the detail didn't stand out. So, I brought out the caviar.
 I didn't want to hide all of the wood, so less was more in this case.
 The wood really stands out next to Dixie Belle Paint Company's Caviar.

 Just a little caviar hit the spot!


Linking To:

Monday, July 6, 2020

Cabinet Door Chalkboard

I have a friend who remodels kitchens, & when he has good quality wooden cabinet doors, he gives them to me.
I use them to teach how to paint & glaze cabinets at Junk Mama's General Store. Often times, people are there to learn but don't take the doors home with them. So, what do I do with the extra doors? Well, in this case, I turned one into a chalkboard.
I first had to fill the holes left behind from the door pulls. I used Dixie Belle's Mud for this.

 Once the mud was dry, I sanded it smooth then painted over the door with the color Fluff.
I created the chalkboard on the recessed middle part of the door using the color Caviar. I first painted horizontally across the door...
 I let the first coat dry, then painted the Caviar in a vertical direction...
 I did a third & final coat horizontally...
 
 I wanted to add a small, faux boxwood wreath to the chalkboard, but before I glued it down, the chalkboard needed to be conditioned. Conditioning the chalkboard prevents a halo being left behind when you erase writing on the board.
 I placed the wreath where I wanted it to go, then conditioned the chalkboard by rubbing the side of a piece of chalk over the paint. I didn't want to condition where I was gluing the wreath because the chalk may prevent the glue from holding it in place.
 Once I had gone over the chalkboard with the chalk, I used a dry paper towel to wipe it back.

 I used E6000 to glue to wreath onto the chalkboard.

 I wrote our wifi password on the chalkboard and hung it in my guest room.

 This was a fun way to repurpose an old cabinet door into something useful.


Linking To:
Related Posts Plugin for WordPress, Blogger...