Showing posts with label Valentine. Show all posts

Tuesday, February 4, 2025

Easy Mixed Media Valentine Art


If you're looking to add a little Valentine art to your home, or want to create something easy to give someone special, this is it!

I love to decorate for every holiday & season. So I change my decor often. And, every year I always want to add something new. This year I made this sweet little artwork that combines canvas, watercolor paper, acrylic paint, & watercolor paint.

I painted a 5" x 5" canvas with Deco Art acrylic paint in the color, Jewel Green.

While the canvas was drying, I cut a piece of watercolor paper to be approximately the same size of the canvas. I dipped a heart shaped cookie cutter in to Artist's Loft watercolor, Alizarin Crimson.


I pressed to cookie cutter onto the watercolor paper.


While the paint was still wet, I saturated my paintbrush with water & filled in the heart. There's no need to dip the brush in the paint. The water will pull the paint into the heart.


I tore about an inch off of the paper around the heart. The rough edge gives it more interest.


So there wasn't such a stark transition between the white watercolor paper & the Jewel Green, I painted a thin, watered down wash of Artist's Loft watercolor, Earth Green. I went a little heavier on the torn edges & kept it very subtle on the rest of the paper.

I used Tacky Glue to adhere the paper to the canvas. 

I didn't add glue all the way to the edges of the paper. I wanted it to appear as though it were attached to the canvas with nail heads. So, I added these nail head type stickers to the corners of the paper.

Having a Galentine's party? This would be a fun project to do with friends. It would also be a great project to do with kids. Fun, easy, & inexpensive!


Linking To:

Saturday, January 18, 2025

Valentine Or Anytime Art


I have been waiting for the perfect piece of furniture to try out the Waterslide Transfers from Dixie Belle Paint Company. However, since my husband retired a year ago, & I closed my booth where I sold painted furniture, I've been a little lazy when it comes to painting furniture. So, I haven't actually been on an active hunt for that perfect piece. 

I've still been wanting to try the waterslide transfer so I thought it would be perfect for a Valentine project.

I first painted a 5" x 5" canvas with the chalk mineral paint color, Fluff. 

The colorful side of the design, that you will see when transferred, has a clear plastic sheet over it. The back is more like paper & is in shades of gray. Having the design on the back helps you line it up properly for your project. I turned the transfer over & used a pencil to trace the canvas on the paper side, then cut it out.

I then removed the plastic sheet from the colorful side of the transfer & placed it on the canvas with the colorful side down. Once I had it placed correctly on the canvas (this is where the gray side comes in handy), I laid a wet paper towel over it. I rubbed over the paper towel with my fingers to make sure the transfer was laying flat against the canvas. 

After letting it sit for 3 minutes, I removed the paper towel & pulled up the transfer backing, leaving the beautiful baroque design on the canvas.


Now for the Valentine part...

I used Sculpey oven bake clay. I conditioned the clay to make it soft & workable, then flattened it to approximately 1/4 inch thickness.

Once the clay was flattened out, I added texture with a stamp from Redesign With Prima.


I used a cookie cutter to cut out a heart. 


I preheated my oven to 275 degrees, then baked the heart for 15 minutes.

I wanted to stick with the neutral colors of the transfer, so once the heart was cooled I painted it with a brown acrylic paint that matched one of the colors in the design.

I didn't worry about perfect coverage because of the next step.

To highlight the texture in the heart, I rubbed on Silver Gilding Wax. I typically go for gold or copper gilding wax, but in this case I wanted to pull out the silver from the transfer. Copper would have been pretty too & given it a completely different look.


I glued the heart to the center of the canvas using E6000.


This is a pretty, neutral piece of art perfect for Valentine's decor if you don't decorate with the traditional red & pink. And, the neutral colors make it perfect for enjoying all year long.


Linking To:

Sunday, February 12, 2023

Slikscreen Stencil Valentine

 I love it when an experiment turns out how I envisioned. This is one of those projects. Unfortunately, there are plenty that didn't. But, that's how you learn, right?

This project not only worked out how I wanted, but was super easy & quick!

I love working with the air dry Modeling Material from Re*design With Prima. Typically, I use it with their molds. But, in this case I wanted to create hearts & didn't have a heart shaped mold. I did, however, have heart shaped cookie cutters.


After rolling the modeling material out with a rolling pin, I cut 2 different sizes of hearts with my cookie cutters.
Another of my favorite things to work with are the Silkscreen Stencils from the Dixie Belle Paint Company. For this project I chose the Mandala design. Each pack has 3 different sheets of designs.


 The screen helps prevent the paint from bleeding under the stencil so you get a crisp image. But, I had no idea how it would work doing it on the modeling material while it was still soft.
I placed the sticky side of the stencil on the heart, then scraped on the chalk mineral paint color, Peony, from Dixie Belle.

When I peeled up the stencil, I was excited to see that it worked perfectly.


Now my mind is spinning with all the ways to use these. I have them on the table riser on my kitchen table. But while soft, they could be glued onto candles, vases, artwork...

The possibilities are endless!


Linking To:

Monday, January 17, 2022

Heart Art DIY

 This was going to be a project for Valentine's Day. But, with the neutral colors, it turned out to be a valentine that I can leave up all year long.

I used an 18" wooden heart from Signopoly.
I stained the wood with Voodoo Gel Stain from the Dixie Belle Paint Company using the color, Tobacco Road. Voodoo Gel Stain is water based & is perfect for raw wood.
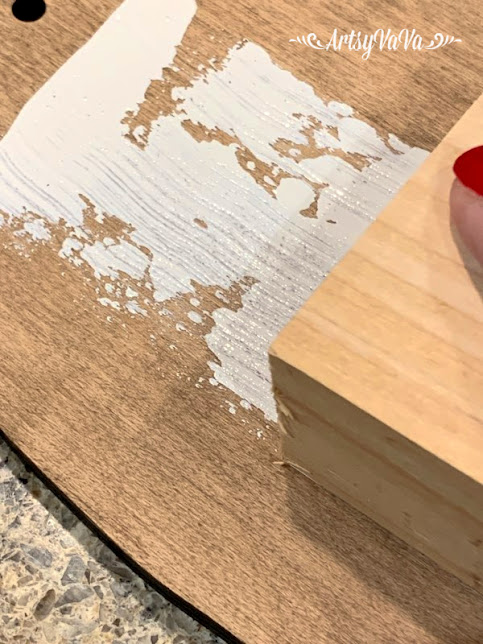
I wanted a rustic look on the heart so I did a smear technique. To achieve this look I put some chalk mineral paint in the color Fluff, onto a paper plate, then dipped the edge of a 2x4 block of wood into the paint.
I drug the block over the heart using light pressure.

To embellish the heart, I grabbed a flower from WoodUBend. I painted the flower with Fluff & set it aside to dry.

While the flower was drying, I cut a leaf shape out of a dictionary page & added glaze to the edges using a damp rag.

To keep the colors neutral on the heart, I used the color Van Dyke Brown glaze. It goes nicely with the Tobacco Road stain.
I glued the flower onto the heart using tacky glue. Then I glued on twine to make a stem, & then glued on the leaf.

I added the glaze to the flower to give it dimension.
I painted the glaze on heavy on the flower & underneath the flower.
I used a damp rag to wipe away the excess glaze, allowing it to rest in the grooves.
The glaze brings out the details of the flower.


I also added glaze the the edges of the heart.
I painted the glaze around the edges of the heart then lightly wiped it back with a damp rag.
I used the same twine that I used for the stem to hang the heart.

This Valentine isn't going to get packed up after February 14!


Linking To:

Related Posts Plugin for WordPress, Blogger...