Showing posts with label Chalk Mineral Paint. Show all posts

Sunday, October 22, 2023

Secret Path To A Table Makeover

 Have you heard? Dixie Paint Paint Company has added 6 new colors to their chalk mineral paint line. That brings the number of colors they offer to 75! A few of those 75 colors have been semi retired & come in 4oz only, but are still available. So, if one of those colors is a favorite, you cam still get it. Thank goodness, because I love Tree Frog Green!

I have had this unfinished wood table for quite some time. I just couldn't decide what I wanted to do with it.

Once the new colors came out, I decided that Secret Path was the perfect color for the table. It's a beautiful mauve color.

I grabbed my favorite synthetic brush, the Dixie Belle Mini, & gave the table 2 coats of Secret Path.

It would have been pretty left alone, but I had the Cacti & Succulent transfer & loved how the colors worked with Secret Path. I always wait at least 24 hours after painting before adding a transfer. So, the following day, I picked a part of the design that I wanted to use for the top of the table. The transfer package comes with 4 sheets that have different designs.

I removed the white backing from the transfer, then started rubbing over the clear top sheet with the tool provided to transfer the design onto the table. Please note: the piece I'm pulling up in the photo appears white the way the light hits it, but in actuality it is clear.

The design was a perfect fit!

Once the design was transferred, I buffed over it with a rag to make sure every piece of the design was adhered.

Finally, I used Dixie Belle's Easy Peasy Spray Wax to seal the table. It really is easy peasy... just shake, spray, & smooth out & your done!


Linking To:

Tuesday, September 6, 2022

Western Tapestry Caddy

When a friend shared this little caddy that her brother made, I had to have some! I knew they'd be perfect for some of the classes that I teach at Junk Mama's General Store.

There are so many options for transforming this blank "canvas". For the first one, I started off painting it with the color Caviar from the Dixie Belle Paint Company. 

Once the paint was dry, I added the Western Tapestry transfer from re*design With Prima, to the front & back of the caddy.


I then painted three small jars with the color Honky Tonk Red.


To accentuate the detail on the jars & age them a little, I added Black Gilding Wax. I simply rubbed it on with my finger.


The jars fit perfectly in the caddy.


There are so many things I can use the caddy & jars for... flowers, pens, pencils, paint brushes, etc. I entertain quite a bit, & the jars are perfect for silverware!


For another caddy, I added my favorite decoupage rice paper from the Dixie Belle Paint Company, Pallet Wood Pattern...

  
I used the Pallet Wood Pattern rice paper while teaching a class for a group of 13 ladies at a church in a neighboring town.
The paper is somewhat sheer & each caddy looked completely different depending on the paint color used...


Have you tried transfers and/or decoupage rice paper? Both are easy to use & add a beautiful design element to your projects.


Linking To:

Thursday, July 21, 2022

Cactus On The Corner

My "go to" color when painting furniture to sell is usually some shade of green. It's odd that I don't decorate my home with green since I love it so much!

And, this corner cabinet is no different... I chose a beautiful color, called Cactus, from Dixie Belle's SILK line of paint. Silk is an acrylic based paint, so it's a little different from their chalk mineral paint line.


The cabinets original finish was cherry.

I don't have a great place to paint large pieces, but when a friend sent me this photo, I couldn't resist!

There was a lot of beautiful detail, but the dark color didn't allow it to stand out.

After cleaning with White Lightening, I gave the piece a light scuff sanding. Unlike with Dixie Belle's chalk mineral paint, a scuff sanding is recommended with Silk.

After the scuff sanding, the piece still had somewhat of a slick finish, so I added Dixie Belle's Slick Stick. This product helps paint stick to any slick surface.


On the door, rather than taping off the glass, I slid parchment paper underneath the mullions so I could paint without worrying about getting the paint on the glass. I added tape to the areas where it was hard to get the parchment underneath the mullions. This works using a deck of cards too, but I wanted something to cover large areas at one time.


More Slick Stick...


I like to wait overnight when moving on from one product to the next. So, I waited until the next day then started painting. With Silk you need to wait 2 hours between coats. 


It took 2 coats of paint for perfect coverage.


To make the beautiful detail stand out, I used Best Dang Wax in the color Black.
I put it on with a wax brush, making sure to get down into all the grooves. Then I wiped it back with a soft rag. I used clear wax to remove the black wax anywhere that I felt it was too heavy.


Now you can see that beautiful detail!


I used Dixie Belle's chalk mineral paint in the color, Caviar to paint the inside of the cabinet.

I can't imagine this piece any other color. Cactus was the perfect choice!


Linking To:

Monday, January 17, 2022

Heart Art DIY

 This was going to be a project for Valentine's Day. But, with the neutral colors, it turned out to be a valentine that I can leave up all year long.

I used an 18" wooden heart from Signopoly.
I stained the wood with Voodoo Gel Stain from the Dixie Belle Paint Company using the color, Tobacco Road. Voodoo Gel Stain is water based & is perfect for raw wood.
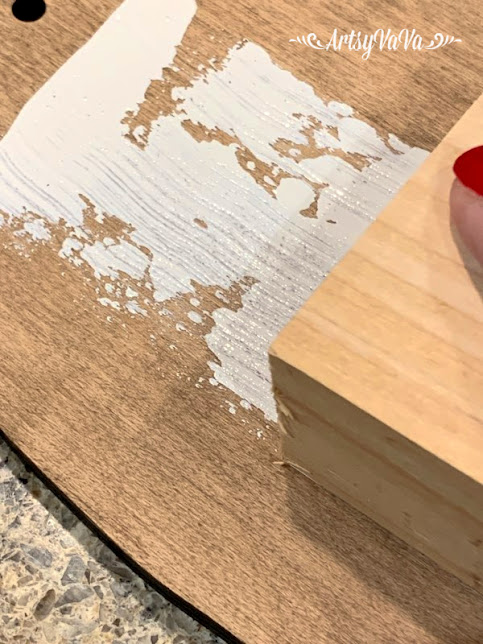
I wanted a rustic look on the heart so I did a smear technique. To achieve this look I put some chalk mineral paint in the color Fluff, onto a paper plate, then dipped the edge of a 2x4 block of wood into the paint.
I drug the block over the heart using light pressure.

To embellish the heart, I grabbed a flower from WoodUBend. I painted the flower with Fluff & set it aside to dry.

While the flower was drying, I cut a leaf shape out of a dictionary page & added glaze to the edges using a damp rag.

To keep the colors neutral on the heart, I used the color Van Dyke Brown glaze. It goes nicely with the Tobacco Road stain.
I glued the flower onto the heart using tacky glue. Then I glued on twine to make a stem, & then glued on the leaf.

I added the glaze to the flower to give it dimension.
I painted the glaze on heavy on the flower & underneath the flower.
I used a damp rag to wipe away the excess glaze, allowing it to rest in the grooves.
The glaze brings out the details of the flower.


I also added glaze the the edges of the heart.
I painted the glaze around the edges of the heart then lightly wiped it back with a damp rag.
I used the same twine that I used for the stem to hang the heart.

This Valentine isn't going to get packed up after February 14!


Linking To:

Related Posts Plugin for WordPress, Blogger...