Tuesday, January 29, 2019

Cabinet Makeover

Oh what a little paint can do!

I picked this sad little cabinet up from a friend. It had seen better days... nothing that a fresh coat of paint can't fix!
 I think it's an old radio/record cabinet because of the openings in the bottom and back. Please correct me if I'm wrong.

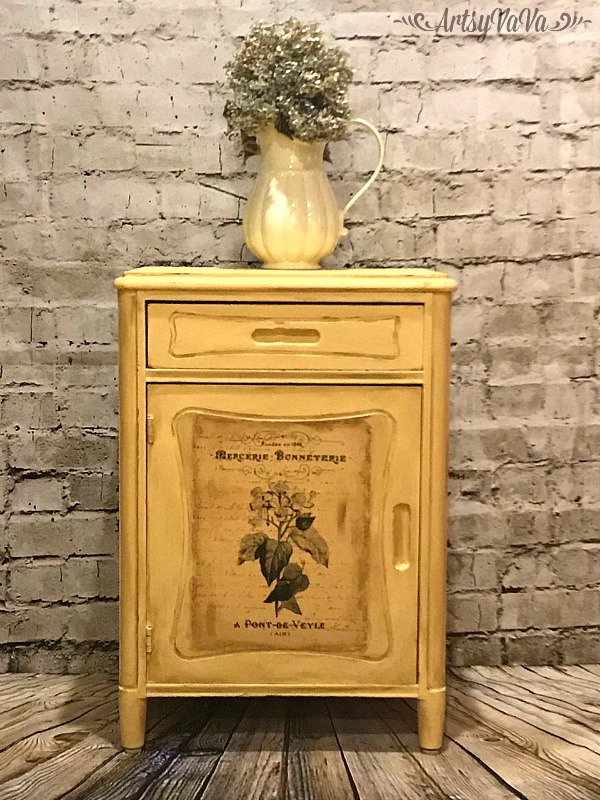
I chose the color, Rebel Yellow, from the Dixie Belle Paint Company. Even though it took 3 coats to cover this dark brown, I only used about 3/4 of the 8oz jar of paint. With Dixie Belle, you apply thin coats to allow it to dry properly. Because of this, the paint goes a long way!
Once the paint was dry, it was time to dress her up!
 I've had this transfer from Re*design With Prima for awhile and decided it was perfect for this project.
 I removed the backing, then positioned it on the cabinet door.
 Then I started rubbing to make the design stick to the door.
 I peeled off the plastic leaving the design on the door.
 I got a little excited that it was coming off perfectly, and pulled it off with the top corner not being adhered properly. No problem, I just sanded the edges of the rest of the transfer to make it look like I meant to do it. A happy mistake :)

 I also sanded along some of the detail.
 I added a little dark brown glaze.


 From dark & drab to sunny yellow!


Linking To:
Ginger Snap CraftsCreations By KaraRae Gun RamblingsChic On a ShoestringSimply Sweet HomeHave A Daily Cup Of Mrs OlsonThe Cottage Market,  Funky Junk InteriorsDIY Showoff, Craft-O-Maniac, Keeping It Simple, I Should Be Mopping The Floor, The Dedicated House Coastal CharmSugar Bee CraftsFlour Me With Love,  Today's Creative Blog, Tip Junkie Homework,  I Gotta Create,   Domestically Speaking,  The Answer Is Chocolate, Skip To My LouThe Thrifty Home,Cedar Hill RanchFlutter BusterNap Time Creations, Hope In Every Season, The Foley FamOur Home Away From Home,  RemodelaholicFlamingo Toes Finding Silver PenniesA Stroll Thru Life, French Country CottageThe Scoop, Stone Gable, Knick Of Time, Lou Lou GirlsOur Hopeful Home, My Thrift Store AddictionThe Painted Hinge, Savvy Southern Style, Tattertots & Jello, Yesterday On Tuesday, Rachel Teodoro, Worthing Court, Confessions Of A Plate Addict, My Uncommon Slice Of Suburbia, Dabbling And Decorating


Tuesday, January 22, 2019

Farmhouse Style Coasters

For Christmas, my husband gave me a laser printer. He couldn't understand why a printer would be at the top of my list, but I'm sure some of you creative people understand!
I do a lot of projects where an ink jet printer just won't do. Now I don't have to print, then drive to Staples to make laser copies. I'm very excited about that!

I've made a lot of stone coasters over the years using the technique where you apply a transfer medium, apply an image face down, let dry, then wet the paper & rub it away. Here are a couple of my first projects with my new printer using that technique...
For these coasters I used a photo I took at night of our old courthouse

For this one I used a photo I took of Starr's Mill. You might recognize it from the movie, Sweet Home Alabama (even though this is Georgia). 
For the courthouse and Starr's Mill coasters I used Dixie Belle's Gator Hide as the transfer medium.

But then I heard about SRTransfer Paper and had to try it. 

I found an image on the Graphics Fairy website that I liked and I resized it to be 4" x 4". I then printed the image in reverse so that the writing wouldn't be backwards once transferred. 

 For this project, I used ModPodge photo transfer medium.
I coated both the paper & a 4" x 4" stone tile with the medium...

 I laid the image printed side down onto the tile and let dry for several hours.
 I saturated the paper with water, then laid wet paper towels on it and let sit for 15 minutes.
 Then I pulled the paper up and it left the image. No rubbing away paper involved!
 I gave the coasters 3 coats of Gator Hide to protect them and make them water repellent.
I tested them out by letting a glass sweat on them and they held up perfectly.


 I tested them out with a hot drink too. No problem!

 It was so easy!
One thing I like better about the other technique is that you see more of the stone. So there will be times when I prefer one technique over the other. But for this project, I give the SRTransfer paper a big thumbs up!

You can find the SRtransferpaper HERE.


Linking To:
Ginger Snap CraftsCreations By KaraRae Gun RamblingsChic On a ShoestringSimply Sweet HomeHave A Daily Cup Of Mrs OlsonThe Cottage Market,  Funky Junk InteriorsDIY Showoff, Craft-O-Maniac, Keeping It Simple, I Should Be Mopping The Floor, The Dedicated House Coastal CharmSugar Bee CraftsFlour Me With Love,  Today's Creative Blog, Tip Junkie Homework,  I Gotta Create,   Domestically Speaking,  The Answer Is Chocolate, Skip To My LouThe Thrifty Home,Cedar Hill RanchFlutter BusterNap Time Creations, Hope In Every Season, The Foley FamOur Home Away From Home,  RemodelaholicFlamingo Toes Finding Silver PenniesA Stroll Thru Life, French Country CottageThe Scoop, Stone Gable, Knick Of Time, Lou Lou GirlsOur Hopeful Home, My Thrift Store AddictionThe Painted Hinge, Savvy Southern Style, Tattertots & Jello, Yesterday On Tuesday, Rachel Teodoro, Worthing Court, Confessions Of A Plate Addict, My Uncommon Slice Of Suburbia, Dabbling And Decorating


Tuesday, January 15, 2019

Windsor Chair Makeover With Prima

Windsor chairs have been around since the 16th century. And, chances are, we've all owned one at some point. I can't even count how many I've painted in my lifetime.
I couldn't wait to get my hands on this typical Windsor chair and try out some new products from Re*design With Prima.

 I first gave the chair 2 coats of the color, Driftwood, from the Dixie Belle Paint Company.
 I was excited to try out the Stick & Style Stencil Roll.
 I cut off a piece of the stencil and placed it along one side of the chair seat. The stencil has an adhesive back so it easily stays in place.
 Because it is made of a vinyl material, I was able to easily cut it and place it around the chair spindles.
 I went over the stencil with the color, Drop Cloth. Because of the adhesive back, I didn't have any problems with the paint bleeding under the stencil. I did go over the edge in a couple of places, but touched that up with the Driftwood.

 I continued this pattern on the top of the chair.
 Once the paint was dry, I added 2 image transfers from Prima.


 I don't think the Windsor chairs of the 16th century looked like this!


A great thing about the Stick & Style Stencil Roll is that you can use it over and over. I'm not sure how many times you can reuse it...probably until the sticky starts to wear off.
Here's a little Valentine project I did using the same piece of the roll that I used on the chair. I placed it on a canvas then peeled it up and re-positioned it over and over until I had covered the canvas with the design.

And, while I'm sharing other projects, here's a sweet little table that I painted and added another Prima transfer to...
I think I'll be in a stenciling & image transfer phase for quite awhile!


Linking To:
Ginger Snap CraftsCreations By KaraRae Gun RamblingsMade In A DayChic On a ShoestringSimply Sweet Home, The Shabby Nest Somewhat Simple,   Live Laugh Rowe, Have A Daily Cup Of Mrs OlsonThe Cottage Market,  Funky Junk InteriorsDIY Showoff, Craft-O-Maniac, Keeping It Simple, I Should Be Mopping The Floor, The Dedicated House Coastal Charm, Reasons To Skip The Housework, Sugar Bee Crafts,  Nifty Thrifty Things, Cherished BlissMad In Crafts, Flour Me With Love, Not Just A HousewifeToday's Creative Blog, Tip Junkie Homework,  I Gotta Create,   Domestically Speaking,  The Answer Is Chocolate, Skip To My LouThe Thrifty Home,Cedar Hill RanchFlutter BusterNap Time Creations, Hope In Every Season, The Foley FamOur Home Away From Home,  RemodelaholicFlamingo Toes Finding Silver PenniesA Stroll Thru Life, French Country CottageThe Scoop, Stone Gable, Knick Of Time, Lou Lou GirlsOur Hopeful Home, The Painted Hinge, Savvy Southern Style, Tattertots & Jello, Yesterday On Tuesday, Rachel Teodoro, Worthing Court, Confessions Of A Plate Addict, My Uncommon Slice Of Suburbia, Dabbling And Decorating


Related Posts Plugin for WordPress, Blogger...