Monday, November 30, 2015

Tart Tin Photo Ornament

I went to a yard sale a few months ago that was being held by a couple who own a German restaurant here in my town. I bought a stack of mini tart tins, some of which still had stickers on the back that said, "Made in Germany."  A few different projects ran through my head of what to do with them. And then, all of a sudden, Christmas was approaching so I decided they'd make perfect photo ornaments. 

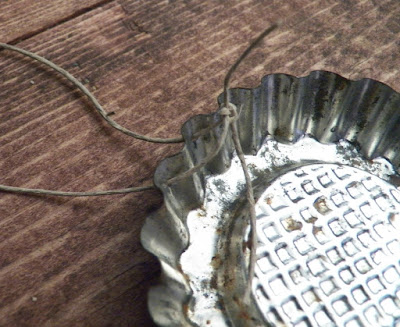
I started by using my metal punch to add 2 holes to the tart tin. This type of punch is made for punching holes in metal and is used on things like bottle caps.
 I threaded twine through the holes and tied a knot. I tied the knot to the inside of the tin so it will be hidden when I add the embellishments.

I printed out one of my favorite photos of my parents...

To know where to cut, I rubbed the edge of a pencil along the rim of the inner raised section of the tin. Then I laid the photo down and rubbed the photo to transfer the pencil marks onto the back of the photo.


Then I cut along the pencil marks...

I added tacky glue to the flat inner section of the tart tin and added the photo...


I added more tacky glue to the tin and added a row of wireless chenille around the photo...


I added a little more tacky glue and a second row of the chenille...


I finished it off with a paper flower to cover the knot...


I think this will be a favorite for many years to come!

Pin It

Linking To:
  Someday Crafts, Sew Much A Do, Ginger Snap CraftsCreations By KaraRae Gun Ramblings, Ivy & Elephants,   Seven Thirty Three The Shabby Creek Cottage, Seven AliveBear Rabbit Bear Crafts, Made In A Day, Katherine's Corner, Redoux, Chic On a ShoestringSimply Sweet Home, The Shabby NestMomnivore's Dilema, Somewhat Simple,   Live Laugh Rowe, Have A Daily Cup Of Mrs OlsonTruly LovelyThe Cottage Market,  Funky Junk Interiors,  Tatertots & Jello,   Blissful & Domestic, A Vision To Remember, Boogieboard Cottage,  DIY Showoff, Craft-O-Maniac,  Under The Table and Dreaming, Keeping It Simple, Homemaker On A Dime, I Should Be Mopping The Floor, The Dedicated House Coastal Charm, Reasons To Skip The Housework, Sugar Bee Crafts,  Nifty Thrifty Things, Cherished Bliss, A Bowl Full Of LemonsMad In Crafts, Flour Me With Love, Not Just A HousewifeToday's Creative Blog, Tip Junkie Homework, Kammy's KornerI Gotta CreateThrifty 101 Domestically Speaking,  C.R.A.F.T., The Answer Is Chocolate, Skip To My LouThe Thrifty HomeAdorned From AboveCedar Hill Ranch, Classy Clutter, Flutter BusterTwelve O Eight, Nap Time Creations, The Shady Porch, JoJo And Eloise, Hope In Every Season, The Foley FamHouse Of HoffOur Home Away From Home, Living Well Spending Less, Remodelaholic, A Lived In Home, Flamingo ToesVMG206 Finding Silver Pennies, Mad Cap Frenzy Gingerly Made,  Pink Heels Pink TruckMinnette's MazeMade To Be A Momma Start At HomeLil Mrs ToriHomecomingThe Vintage FarmhousePink Recipe BoxSweet HauteTable For SevenBe BetsyIt Happens In A BlinkOne Dog Woof, 4 You With Love, A Stroll Thru LifeA Bright And Beautiful LifeCrafty Goodies Live Love CreateThe Koenigs CreateBloom Designs,French Country Cottage, Daisy Cottage Designs, Orchard Girls, Elizabeth Joan Designs, The Scoop, Stone Gable, Knick Of Time, Lou Lou Girls, Karen's Up On The Hill, Friday's Furniture Fix, DIY-Crush,


Photobucket/

Wednesday, November 25, 2015

The Melting Snowman


Last week I shared how a friend gave me a bag of rocks because she wanted to see what I could do with them. 
Here is the project that I already shared...
You can see that post HERE.

I took on the rock challenge again!
One of the rocks was rather small and was round but somewhat flat. So, it was perfect for a head.
I used Sculpey oven bake clay, conditioned it, and pressed it out into a "not perfect" circle. Then I inserted the rock into the clay.
I baked it according to the package directions. When it cooled, I painted the clay and the rock with white acrylic paint. I painted the face, also with acrylic paint, added three buttons to his melted belly, and tied a piece of yarn around his neck for a scarf.
Easy and super cute!
This would be a fun project for kids. Let them find their own rocks and create a whole family of melting snowmen.
Stay tuned for the next rock challenge!
Pin It

Linking To:
  Someday Crafts, Sew Much A Do, Ginger Snap CraftsCreations By KaraRae Gun Ramblings, Ivy & Elephants,   Seven Thirty Three The Shabby Creek Cottage, Seven AliveBear Rabbit Bear Crafts, Made In A Day, Katherine's Corner, Redoux, Chic On a ShoestringSimply Sweet Home, The Shabby NestMomnivore's Dilema, Somewhat Simple,   Live Laugh Rowe, Have A Daily Cup Of Mrs OlsonTruly LovelyThe Cottage Market,  Funky Junk Interiors,  Tatertots & Jello,   Blissful & Domestic, A Vision To Remember, Boogieboard Cottage,  DIY Showoff, Craft-O-Maniac,  Under The Table and Dreaming, Keeping It Simple, Homemaker On A Dime, I Should Be Mopping The Floor, The Dedicated House Coastal Charm, Reasons To Skip The Housework, Sugar Bee Crafts,  Nifty Thrifty Things, Cherished Bliss, A Bowl Full Of LemonsMad In Crafts, Flour Me With Love, Not Just A HousewifeToday's Creative Blog, Tip Junkie Homework, Kammy's KornerI Gotta CreateThrifty 101 Domestically Speaking,  C.R.A.F.T., The Answer Is Chocolate, Skip To My LouThe Thrifty HomeAdorned From AboveCedar Hill Ranch, Classy Clutter, Flutter BusterTwelve O Eight, Nap Time Creations, The Shady Porch, JoJo And Eloise, Hope In Every Season, The Foley FamHouse Of HoffOur Home Away From Home, Living Well Spending Less, Remodelaholic, A Lived In Home, Flamingo ToesVMG206 Finding Silver Pennies, Mad Cap Frenzy Gingerly Made,  Pink Heels Pink TruckMinnette's MazeMade To Be A Momma Start At HomeLil Mrs ToriHomecomingThe Vintage FarmhousePink Recipe BoxSweet HauteTable For SevenBe BetsyIt Happens In A BlinkOne Dog Woof, 4 You With Love, A Stroll Thru LifeA Bright And Beautiful LifeCrafty Goodies Live Love CreateThe Koenigs CreateBloom Designs,French Country Cottage, Daisy Cottage Designs, Orchard Girls, Elizabeth Joan Designs, The Scoop, Stone Gable, Knick Of Time, Lou Lou Girls, Karen's Up On The Hill, Friday's Furniture Fix, DIY-Crush,

Photobucket/

Wednesday, November 18, 2015

Happy Camper Christmas

My birthday was back in August. My friend, Elizabeth, told me that her husband said that she should just give me a bag of rocks for my birthday because I could figure out what to do with them. Well, a couple of weeks ago, she gave me a bag of rocks! And, I was up for the challenge.

For Rock Challenge #1, I created a cute winter camping scene.

For this challenge I started with one of the larger rocks.

I covered most of the rock with DecoArt Snow-Tex. 

While the Snow-Tex was still wet, I added a cute little vintage style camper that I found at Michael's.

Then I inserted a tree into the snow.

I made a banner by folding red paper tape over bakers twine and  cutting it to form triangles.


I cut a paper straw in half, then punched holes in one end and threaded the bakers twine through them.


I used hot glue to attach the straws to the back of the rock.


Thanks for the challenge, Bobby & Elizabeth!

Camping North Pole style!

Pin It


Linking To:
  Someday Crafts, Sew Much A Do, Ginger Snap CraftsCreations By KaraRae Gun Ramblings, Ivy & Elephants,   Seven Thirty Three The Shabby Creek Cottage, Seven AliveBear Rabbit Bear Crafts, Made In A Day, Katherine's Corner, Redoux, Chic On a ShoestringSimply Sweet Home, The Shabby NestMomnivore's Dilema, Somewhat Simple,   Live Laugh Rowe, Have A Daily Cup Of Mrs OlsonTruly LovelyThe Cottage Market,  Funky Junk Interiors,  Tatertots & Jello,   Blissful & Domestic, A Vision To Remember, Boogieboard Cottage,  DIY Showoff, Craft-O-Maniac,  Under The Table and Dreaming, Keeping It Simple, Homemaker On A Dime, I Should Be Mopping The Floor, The Dedicated House Coastal Charm, Reasons To Skip The Housework, Sugar Bee Crafts,  Nifty Thrifty Things, Cherished Bliss, A Bowl Full Of LemonsMad In Crafts, Flour Me With Love, Not Just A HousewifeToday's Creative Blog, Tip Junkie Homework, Kammy's KornerI Gotta CreateThrifty 101 Domestically Speaking,  C.R.A.F.T., The Answer Is Chocolate, Skip To My LouThe Thrifty HomeAdorned From AboveCedar Hill Ranch, Classy Clutter, Flutter BusterTwelve O Eight, Nap Time Creations, The Shady Porch, JoJo And Eloise, Hope In Every Season, The Foley FamHouse Of HoffOur Home Away From Home, Living Well Spending Less, Remodelaholic, A Lived In Home, Flamingo ToesVMG206 Finding Silver Pennies, Mad Cap Frenzy Gingerly MadePink WhenMinnette's MazeMade To Be A Momma Start At HomeLil Mrs ToriHomecomingThe Vintage FarmhousePink Recipe BoxSweet HauteTable For SevenBe BetsyIt Happens In A BlinkOne Dog Woof, 4 You With Love, A Stroll Thru LifeA Bright And Beautiful LifeCrafty Goodies Live Love CreateThe Koenigs CreateBloom Designs,French Country Cottage, Daisy Cottage Designs, Orchard Girls, Elizabeth Joan Designs, The Scoop, Stone Gable, Knick Of Time, Lou Lou Girls, Karen's Up On The Hill, Friday's Furniture Fix, DIY-Crush,


Photobucket/

Monday, November 9, 2015

DIY Thankful Photo Display

November is the month when we share what we are thankful for. This DIY project let's you share what you are thankful for year round.

Here's what you'll need:
Wooden Board
Paint in 2 Colors
Vinyl Letters
Paintbrush
Ruler
Pencil
Sandpaper
Clips
Industrial Strength Glue
Picture Hanging Hardware


Cut a board to the length you want. I was lucky and found a piece already cut the size I wanted in some of our scrap lumber. Your local home improvement store will cut the boards for you if you don't have the tools to do it yourself.

Sand any rough edges, then paint the board in the color that you want the letters to be.

Use a ruler to draw a straight line where you will place the vinyl letters.

Place the vinyl letters along the line, spelling out the word, thankful.

Paint over the board and letters with the second color of paint.

Peel up the vinyl letters.

Lightly sand the board to give the sign a distressed look.

Glue on clips using E6000. These were found in the scrapbook section at Michael's. You could also use mini clothespins.

Add picture hanging hardware to the back, then add your favorite photos.

Pin It

Linking To:
  Someday Crafts, Sew Much A Do, Ginger Snap CraftsCreations By KaraRae Gun Ramblings, Ivy & Elephants,   Seven Thirty Three The Shabby Creek Cottage, Seven AliveBear Rabbit Bear Crafts, Made In A Day, Katherine's Corner, Redoux, Chic On a ShoestringSimply Sweet Home, The Shabby NestMomnivore's Dilema, Somewhat Simple,   Live Laugh Rowe, Have A Daily Cup Of Mrs OlsonTruly LovelyThe Cottage Market,  Funky Junk Interiors,  Tatertots & Jello,   Blissful & Domestic, A Vision To Remember, Boogieboard Cottage,  DIY Showoff, Craft-O-Maniac,  Under The Table and Dreaming, Keeping It Simple, Homemaker On A Dime, I Should Be Mopping The Floor, The Dedicated House Coastal Charm, Reasons To Skip The Housework, Sugar Bee Crafts,  Nifty Thrifty Things, Cherished Bliss, A Bowl Full Of LemonsMad In Crafts, Flour Me With Love, Not Just A HousewifeToday's Creative Blog, Tip Junkie Homework, Kammy's KornerI Gotta CreateThrifty 101 Domestically Speaking,  C.R.A.F.T., The Answer Is Chocolate, Skip To My LouThe Thrifty HomeAdorned From AboveCedar Hill Ranch, Classy Clutter, Flutter BusterTwelve O Eight, Nap Time Creations, The Shady Porch, JoJo And Eloise, Hope In Every Season, The Foley FamHouse Of HoffOur Home Away From Home, Living Well Spending Less, Remodelaholic, A Lived In Home, Flamingo ToesVMG206 Finding Silver Pennies, Mad Cap Frenzy Gingerly MadePink WhenMinnette's MazeMade To Be A Momma Start At HomeLil Mrs ToriHomecomingThe Vintage FarmhousePink Recipe BoxSweet HauteTable For SevenBe BetsyIt Happens In A BlinkOne Dog Woof, 4 You With Love, A Stroll Thru LifeA Bright And Beautiful LifeCrafty Goodies Live Love CreateThe Koenigs CreateBloom Designs,French Country Cottage, Daisy Cottage Designs, Orchard Girls, Elizabeth Joan Designs, The Scoop, Stone Gable, Knick Of Time, Lou Lou Girls, Karen's Up On The Hill, Friday's Furniture Fix, DIY-Crush,


Photobucket/
Related Posts Plugin for WordPress, Blogger...