

Supplies:
Aluminum Cuff Blank- You can make your own but I prefer to get them already made. I get mine from a shop on ETSY called GOTTAGETADEAL
Diamond Glaze- You can also use ModPodge
Sandpaper- Is that one word or two? Hmm.
Pages From An Old Book- I buy old books at the thrift store. You can usually get them for under $1.
Rubber Stamps
Ink Pads- Make sure the ink is permanent so it won't run when you glaze the design.
Markers- Once again, permanent!
Paint Brush

The aluminum cuff will have a shiny, slick finish so lightly sand it inside and out so that your paper will adhere better.

Add some Diamond Glaze to the inside of the cuff and spread it out with your paint brush. Then adhere the book page to the cuff. You can make sure it's straight by lining up the end of the cuff with a line of words. Smooth the paper out and then gently tear the paper along the edge of the cuff.


Next, do the same process to the outside of the cuff...
glaze, adhere, tear.
Then, lightly sand the edges to remove any paper that hangs over the edge. It's best to let it dry before you sand or you may pull some of the paper off.


Now for the fun part!!!
Ink the stamp with the design that will go in the center. Stamp the cuff. Make sure you roll the cuff from side to side so you don't lose any of the design since the cuff is curved.


Now stamp the rest of the cuff with an "all over" design. I use one that is kind of a swirly design.


Now, you could stop there and just glaze over the cuff and be done with it! But, I like to add a little color!
I like to use BIC Mark It markers to add color.


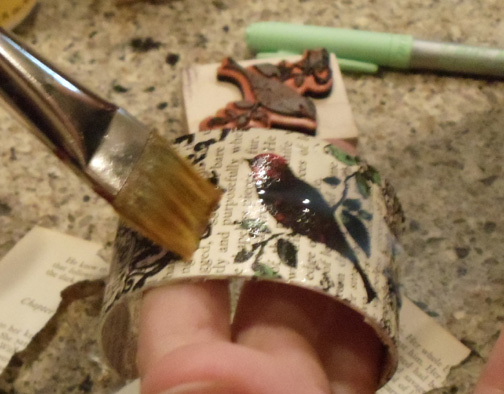
For the final step, use the Diamond Glaze to seal the inside and outside of the cuff. I usually put 3 coats on the outside to make it super shiny. If you don't want yours shiny, then use a matte finish sealer.

Voila! Finished...

More examples...


On the cuff above with the key, instead of stamping my curly design around the key, I just "dirtied" up the edges with some brown acrylic paint on a damp paper towel.
More...

The top 2 in the photo above are done using vintage dress patterns.
The bird and pear on the second row I drew using the markers.
I recently had "the girls" over for a cuff crafting party. Here are pics of some of their creations...


This project would be lots of fun to do with the kids. Go ahead and cover the cuff for them, then give them some markers and let them get creative! What a great keepsake for mom or grandma!!!

Love your cuff bracelet tutorial thank you have her bookmarked so I can purchase some of those if he cant make them for me!!! Thank u...
ReplyDeleteawesome. will definatly give it a try.
ReplyDeleteHi, I am your newest follower visiting from the Graphics Fairy Brag Monday party - your creations are lovely!
ReplyDeletePeggy
Those are darling!!! What a creative idea to cover them with book pages. Thanks so much for inviting me over to look at these! I am your newest follower.
ReplyDeleteJill
شركة تنظيف بيارات بالرياض
ReplyDeleteشركة نقل اثاث بالرياض
شركة نقل عفش بالرياض
شركة تخزين اثاث بالرياض
مستودعات تخزين اثاث بالرياض
شركة تخزين عفش بالرياض
شركة مكافحة حشرات بالرياض
شركة مكافحة حشرات
شركة مكافحة الصراصير بالرياض
شركة رش مبيدات بالرياض
شركة مكافحة النمل الأبيض بالرياض
شركة تنظيف مسابح بالرياض
تنظيف مسابح بالرياض
شركة تنظيف بالرياض
شركة نظافة بالرياض
شركة نقل عفش بجدة
ReplyDeleteشركة تنظيف خزانات بجدة
شركة نقل عفش بالرياض
شركة نقل عفش بالطائف
شركة نقل عفش بالدمام
شركة نقل عفش بمكة
شركة نقل عفش بالمدينة المنورة
ReplyDeleteشركة نقل عفش بالدمام
شركة نقل عفش بالمدينة المنورة
شركة نقل عفش بجدة
شركة نقل عفش بمكة
شركة نقل عفش بالطائف
شركة نقل عفش بالرياض
شركة نقل عفش بينبع
نقل العفش والتخزين
شركة نقل عفش بالمدينة المنورة
شركة نقل عفش بالمدينة المنورة
شركة نقل عفش
This comment has been removed by the author.
ReplyDelete