Wednesday, June 1, 2011

On Display

Who doesn't love to display pictures of wonderful memories of family and friends?
I recently made this photo display piece to have yet another place to do so. Right now I have pictures of summertime fun and plan to change out the pictures with each season. You can also add inspirational quotes if you like. You could make one for each child in your household to have a place to display their artwork, awards, chores, schedule, or whatever. This is an easy and inexpensive project!

What you'll need...
A Frame- the one I used is 18" x 24"
Paint- I used Americana acrylic paint in Light Avocado
Sandpaper (optional)
Decorative Paper
Small craft clothespins- the ones I used are 2" long
Mod Podge- This is a staple no house should be without!
Chicken Wire
Picture hanging hardware
Paint Brushes

Start by painting the frame in any color to match your decor.
Tip: I like to save yogurt cups to put the paint in.
Make sure you paint the back of the frame too. 
Since there is nothing in the frame you can tell if the back is left undone.

This next step is optional...
If you like the frame as is, leave it alone.
If you like a more shabby chic or rustic look, then lightly sand the edges and some of the high points.

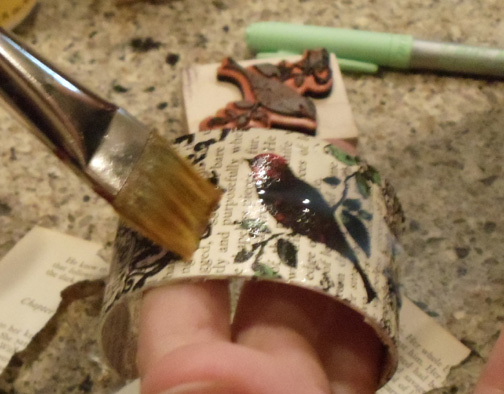
While the frame is drying, decorate the clothespins.
Trace around the clothespins on the back of the scrapbook paper, then cut out the pieces.
Once you have the paper pieces cut out, paint Mod Podge on one side of each clothespin and attach the paper to the clothespin.
How Cute!

Now, cut out a piece of chicken wire measured to fit in the frame.
Attach the chicken wire to the frame with a staple gun.

Attach hardware so that you can hang your photo display. 

That's it! Easy!
Just attach your favorite photos (or whatever) to the chicken wire using your adorable clothespins...


P.S. I made lots of extra clothespins so I can keep adding to my display!

Saturday, May 21, 2011

Cuffed!

I have been going crazy making these cute cuff bracelets. They are really easy to make and it's a quick project. So, get busy...here's how...

Supplies:
Aluminum Cuff Blank- You can make your own but I prefer to get them already made. I get mine from a shop on ETSY called GOTTAGETADEAL
Diamond Glaze- You can also use ModPodge
Sandpaper- Is that one word or two? Hmm.
Pages From An Old Book- I buy old books at the thrift store. You can usually get them for under $1.
Rubber Stamps
Ink Pads- Make sure the ink is permanent so it won't run when you glaze the design.
Markers- Once again, permanent!
Paint Brush
The aluminum cuff will have a shiny, slick finish so lightly sand it inside and out so that your paper will adhere better.

Add some Diamond Glaze to the inside of the cuff and spread it out with your paint brush. Then adhere the book page to the cuff. You can make sure it's straight by lining up the end of the cuff with a line of words. Smooth the paper out and then gently tear the paper along the edge of the cuff.


Next, do the same process to the outside of the cuff...
glaze, adhere, tear.
Then, lightly sand the edges to remove any paper that hangs over the edge. It's best to let it dry before you sand or you may pull some of the paper off.

Now for the fun part!!!
Ink the stamp with the design that will go in the center. Stamp the cuff. Make sure you roll the cuff from side to side so you don't lose any of the design since the cuff is curved.

Now stamp the rest of the cuff with an "all over" design. I use one that is kind of a swirly design.


Now, you could stop there and just glaze over the cuff and be done with it! But, I like to add a little color!
I like to use BIC Mark It markers to add color.
For the final step, use the Diamond Glaze to seal the inside and outside of the cuff. I usually put 3 coats on the outside to make it super shiny. If you don't want yours shiny, then use a matte finish sealer.
Voila! Finished...

More examples...
On the cuff above with the key, instead of stamping my curly design around the key, I just "dirtied" up the edges with some brown acrylic paint on a damp paper towel.
More...
The top 2 in the photo above are done using vintage dress patterns.
The bird and pear on the second row I drew using the markers.

I recently had "the girls" over for a cuff crafting party. Here are pics of some of their creations...


This project would be lots of fun to do with the kids. Go ahead and cover the cuff for them, then give them some markers and let them get creative! What a great keepsake for mom or grandma!!!

Wednesday, May 11, 2011

Rebirth

I LOVE TO PAINT FURNITURE! I love adding life to a piece that was destined for the dump. Transforming someones' trash and giving it a place of prominence in a home is thrilling (to me anyway). When you have a piece of furniture that you feel is no longer of use or value to you, try looking at it with different eyes. Could it be transformed into something wonderful with a simple coat of paint? Or can it be changed into something entirely different, and serve another purpose?
About 15 years ago, I saw a chair sitting on the curb of a neighbors house, sadly waiting to be picked up with the rest of the garbage. It had seen better days. It was old. It was dirty.  It had a red vinyl seat (yuck). But, it had "good bones" as they say. It was sturdy. It had potential. I couldn't imagine why this chair would be sent off to the dump rather than given away or donated to charity! I quickly ran inside and called my neighbor to make sure that she really meant to discard the chair with her weekly rubbish or if it was a horrible mistake. When she told me that she meant to throw away "the piece of junk", I asked if I could have it. She couldn't understand why I'd want it, but agreed to let me retrieve it from the curb. I took it home, cleaned it up, removed the horrible red vinyl from the seat, and began to paint. I wish I had a picture but you'll just have to use your imagination...I gave the chair a fresh coat of white paint, I painted cute little flowers on it. On one of the slats, I painted my daughter's name, Carrie. On the next slat, I painted "princess of quite a lot". I covered the seat in a pink and white check. It was stinking cute! (Stinking cute means I like it a lot)!
Carrie eventually outgrew the cute pink and white theme so I transformed the chair yet again. I painted it blue and added a brown and blue floral fabric to the seat. Once again...stinking cute! It has sat on my screen porch for several years now, still sturdy, still not worthy of the dump, still no picture...sorry.
Now we have redone Carrie's room. She's like her mom...3 years is about enough of the same colors and theme. Her beautiful Paris themed, soft green and brown room has been changed to turquoise with accents of orange. Since we're on a roll of changing things, why not change the chair and reunite it with Carrie? I painted it orange and added a fun, turquoise and green paisley fabric. Even though there is no orange in the fabric, the paint works well with the fabric because they are both bright and those colors are present in the room. Yay!!! I remembered to take pictures...


Below is a picture of a bed and nightstands that I painted black. The bed was a veneer so I had to prime before I painted. If I do say so myself, it looks like something out of Pottery Barn! The painting on the wall I took from the pillows on the bed.
The bed came with a dresser, but I didn't need it in my guest room. I did however need a bar for my porch! So, I completely reinvented the dresser. I removed the drawers and cut away the wood that divided each drawer. I painted the dresser yellow and distressed it. I had a large mirror that was cut the wrong size for my bathroom so I had it cut at a glass shop to make the shelves inside the dresser/bar. I added a metal wine glass holder that I got at my local home improvement store. So, for around $20, I have a great bar for my porch...


Related Posts Plugin for WordPress, Blogger...