Wednesday, November 30, 2011

200,000 Views Winner

We have a winner in the 200,000 page views giveaway!!!

And the winner of one of my vintage rings is...
Donna!
Congratulations!
Please reply to the email I sent you so I can get your ring in the mail.

Thanks to everyone who entered.

Sunday, November 27, 2011

200,000 Views Giveaway

When I started this blog, I figured just a hand full of friends and a couple of family members would read it. I never imagined all the blogging buddies I would make. I didn't know about "followers" and wouldn't have dreamed that I would be on my way to having 300 of them! If just one person a day checked out my blog, I was thrilled! So, needless to say, I am in shock and so excited that I am about to hit 200,000 page views!!!
To celebrate this milestone, I want to give one of my readers one of my vintage rings that I have available in my ETSY shop, Flypaint.
I make the rings from vintage earrings...or earbobs as my mother called them.

There are 3 ways to Enter...

1. Go Here to visit my ETSY shop and come back and leave a comment telling me which ring is your favorite.
2. Leave a separate comment to let me know if you are a Follower of my blog.
3. Leave a comment to let me know if you "LIKE" ArtsyVaVa on Facebook.

I'll announce a winner on Wednesday!
Good luck 
&
thank you, thank you, thank you!

Saturday, November 26, 2011

Cupcake Ornaments

I've seen quite a few cupcake ornaments on Pinterest recently.
Here's my version...

They are so easy and inexpensive to make.

I used light pink ornaments that cost $5.99 for a box of 8 ornaments and I had a 40% off coupon. This made the box of ornaments $3.60 or 45 cents each
I bought baking cups at Michael's for $1.99 a pack. I can't remember how many were in a pack, but it comes out to just a few cents per ornament.
For the frosting, I used Snow Tex. It cost $3.99 a jar. I was able to make 5 ornaments per jar which comes out to approximately 80 cents per ornament.
The sprinkles are made using seed beads that I've had forever so I don't know how much they cost (so we'll consider them free).
For the cherry, I bought a spray of berries for $1.29. There were 25 berries per spray so the cost was about 5 cents per ornament.
I glued the ornament into the baking cup using E6000.
When I added the Snow Tex, I made sure that I covered the hanger on the ornament allowing just a little of the loop to stick out to be able to hold a hook.
Then I just drizzled on the beads. They stuck perfectly to the Snow Tex without having to push them into the "frosting."
For the cherry, I pulled a berry off of the spray and stuck it into the Snow Tex.
 I allowed the Snow Tex to harden overnight.

These ornaments turned out so cute and cost under $2 each!

Burlap Christmas Trees

Burlap seems to be making its way into a lot of my projects lately. I love the simple, rustic look of it, plus it's inexpensive!
I recently made 2 burlap Christmas trees that will be a great addition to my holiday decor.
Here's how I made them...

Supplies...
Burlap
Styrofoam Tree  Forms
Small Rusted Star Tree Topper
Small Rusted Star Ornaments
Artist Wire
Pins
E6000 Glue
Wooden Candlestick
Acrylic Paint

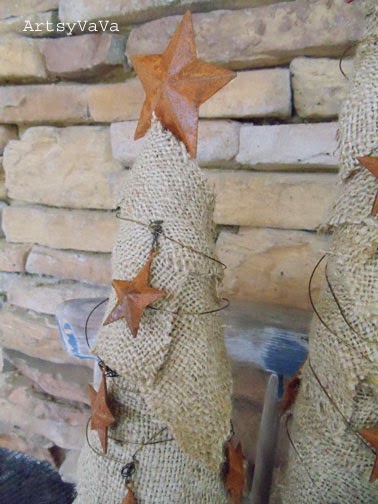
I started by pinning a small piece of burlap to cover the top of the styrofoam and gluing on the star topper...


Then I cut strips of the burlap and began pinning it in place working from the bottom up...

I overlapped the strips of burlap to hide the  pins and the styrofoam.

The stars had a long loop for hanging...
Rather than cut the loop off, I crumpled it into a ball so the stars would still dangle...

I cut pieces of the artist wire, ran it through the crumpled loop, and gave it a twist...


I found that it was easiest to work with shorter pieces of wire and one star at a time, rather than a long piece of wire with all the stars attached.

I took the wire with the attached star and pushed one end of the wire into the back of the tree, wrapped the wire and star around the tree, and pushed the other end of wire into the tree...
I took a wooden candle stick that I got at a yard sale for a quarter and painted it with brown paint...
 Keeping with the rustic feel, I made sure I didn't get complete coverage of the paint...

Finally, I glued the candlestick to the base of the tree using E6000...
Now for the problem...
I don't know where to put them!
They look great on my mantel...

But, I think I like them even better on my back porch...
I have them sitting on an old high chair by my porch fireplace...
I'm sure they will be moved around a few times before they find their perfect home!

Tuesday, November 15, 2011

The Welcome Window

Today I am sharing a cute project I did for my front porch.
I bought an old window frame for $5. I have lots of old windows in my garage that were given to me for free, but I liked this one because the glass was missing. I also liked the fact that there were no horizontal slats, only one vertical.

I had this metal flower bucket that I haven't used in years...

It was perfect for this project except for the fact that it says, "Summer Garden." That would be fine for summer, but I want to use it year round. So, I cut a strip of burlap large enough to cover the letters and glued it onto the bucket with E6000...

Then, I made a banner with the rest of the burlap. I stamped the word, "Welcome" on the banner...

I attached the triangles of burlap to a hemp cord using E6000...

I put heavy things on the burlap to make sure it stayed attached to the cord...

Once my glue was dry on the bucket and the banner, I attached them to the window frame. I put floral foam in the bucket and added some sticks I got out of my yard...

I love how this turned out. It's a great way to welcome my guests. Now, if I can just get them to use the front door!


Wednesday, November 9, 2011

Her Majesty

Senoia, Georgia is a cute little town just a few minutes South of my house. Last year the town was host to the Southern Living Idea House. Southern Living is back in Senoia now redoing an older home to be an idea house that will be open to the public this summer. I have never heard of SL doing 2 Idea Houses in one town, but Senoia is so charming that I'm not surprised!
There are so many cute shops is Senoia, but my favorite is Cydney's Alley. Liz, the owner of Cydney's Alley, and I have very similar tastes and I have enjoyed getting to know her over the last couple of years. Recently, Liz asked me to do some work on this headboard...

Her plans were to not use it as a headboard, but as a piece of art hanging above a sofa in her bedroom. It truly is a piece of art. The details are nice and the painting at the top is lovely.
Here are the instructions Liz gave me for the headboard:
Leave the painting in tact.
Paint the rest light gray.
Add dark gray on the scroll parts.
Beat the heck out of it to make sure it still looks old. Expose some of the white and the green that was underneath the white. 
Add the phrase, "Let it be" in French.

I was so excited about this project that I finished it the same night that I brought it home!
Here she is...
I painted 2 coats of the light gray. While the second coat was still a little wet, I scraped it in some places with an old credit card to expose some of the white.

I painted the scroll pieces with a dark gray. I added touches of turquoise to the dark gray to tie in the accent color in her room.

Once dry, I got out my mouse sander and went to town!
Once I had it sanded the way I liked it, I came back and added the phrase, "Let it be" in French... "Laissez Lui Soyez." I measured and used chalk lines to make sure my lettering was even. I used the same dark gray that I used on the scroll parts to paint the letters with touches of the turquoise. Once the letters were dry, I sanded over them.


I love how the headboard turned out! The hardest part was giving it back. I wanted to tell Liz that it had been destroyed in a fire so I could keep it! But, I'm a horrible liar!
Let's look at Her Majesty some more...


Related Posts Plugin for WordPress, Blogger...