Wednesday, June 29, 2011

Facebook

Well, I swore I'd never do it, but I have jumped into the world of Facebook. Everything I read about promoting your blog or ETSY shop touts the benefits of having a Facebook Fan Page. So, technically, it's not about me...it's about my alter ego ArtsyVaVa. If you are on Facebook (which you probably are...I think I'm one of the last holdouts) I hope you will consider becoming a fan. Please? Pretty please?
Now for the good stuff...the FIRST person to become a fan of ArtsyVaVa will receive $20 worth of free stuff from my ETSY shop. My shop is called Flypaint. Check it out and pick what you want. Some things are really inexpensive so you might get several items. I'll also pay for the shipping. Of course, I wouldn't make you pay for something you won!!! Follow the link on my blog to take you to the ArtsyVaVa Facebook page.

Monday, June 27, 2011

Make Your Own Hummingbird Feeder

There are plenty of flowers in my yard to attract hummingbirds, but I attract even more when I add these great feeders. They are easy to make and very inexpensive.
Here's how you can make your own...

Supplies:
Bottle: I used a blue wine bottle so I could have a patriotic theme for the 4th of July.
Enamel Paint: I used Folk Art. 
Paint Brushes
Copper wire
Hummingbird Stopper: I got mine through a company called AFTOSA
Now, you could skip the whole painting part if you want and just wrap the copper around the bottle and be done with it. It would look fine that way but I like to paint the bottles to make them more colorful.
Your bottle will hang upside down, so keep that in mind when you paint your design.
I painted white even where my red is going to be to act as a primer. It takes a lot of coats to get good coverage! You have to wait an hour between coats, which is very hard for me! The waiting drives me crazy!
In the picture above, I think I'm on my 4th coat. I decided that was enough!
Next, it's time to add the red. And since I primed with the white, I only had to do one coat.

Once again, the waiting part! Read the label on the paint bottle for curing times. Most enamel paints will cure in 10 days or you can bake the bottle in the oven. I prefer the baking method so it will be finished faster. I just place the bottle in a cold oven then turn it to the desired temperature (again, read the label). I let it bake for 30 minutes once it reaches the right temperature. After the 30 minutes, turn the oven off and let it cool completely. I usually do this at night and let it cool in the oven overnight.

Once your bottle is ready, start wrapping it with the copper starting at the neck of the bottle. I used a 3 foot length for this bottle. They will cut it for you at the hardware store.


When you get to the top of the bottle (actually it is the bottom of the bottle but it is the top of the feeder), make a loop with the wire to hang it with.

Now it's time to add the food! Add the stopper and your feeder is ready to hang.
NOTE: Overfill the bottle to prevent leaks. This creates a vacuum so your feeder won't drip.

Hang the feeder and enjoy watching your hummingbirds! They certainly will enjoy your feeder!
HAPPY 4TH OF JULY!

Here are a couple of other examples...


Cost for this project...
Bottle- free
Paint- I think I paid $1.99 a bottle. I've had them a long time. A little paint goes a long way!
Copper- $1.98 (66 cents per foot)
Stopper- 83cents (plus shipping)
Since I had everything I needed except for the copper, this feeder cost me under $2 to make.

Tuesday, June 21, 2011

Spoon Plant Markers

It's that time of year when the herbs in the garden are abundant. These plant markers made from spoons are a great way to make your garden even more beautiful.

Here's what you'll need to make them...

SPOONS: I bought mine at the flea market for $1 each. I used iced tea spoons because the handles are longer, but you could use any kind.
PAPER
PENCIL
PAPER TOWELS
FINE TIP BLACK MARKER
MARKERS IN VARIOUS COLORS: I used Bic Mark It
BROWN PAINT: I used Folk Art acrylic paint in Burnt Umber
DIAMOND GLAZE OR MOD PODGE
SEALER FOR EXTERIOR USE

Start by tracing around the spoon so you know the size your image needs to be.

I then used my fine tip marker to draw a simple sketch of my herbs and write the name of the herbs. You could skip this part and just use clip art off the computer if you want.


Next, add some color with the markers.


Gently tear away the paper around your image. Make sure it fits inside the spoon (if it doesn't, then gently tear away more paper).


Now, you could leave the image as is, but I like to age mine a little. I take a damp paper towel and dip it in a little of the brown acrylic paint. I dab off most of the paint and then do a light wash over my image. Practice this first on a piece of scrap paper so you don't get the image too dark.


To age it a little more, I dip my paper towel back in the paint and without dabbing most of it off this time, I wipe it along the edge of my paper.

Put some Diamond Glaze or Mod Podge in the center of the spoon and attach the image.


Spray it with a protective sealer and stick it in the dirt! 


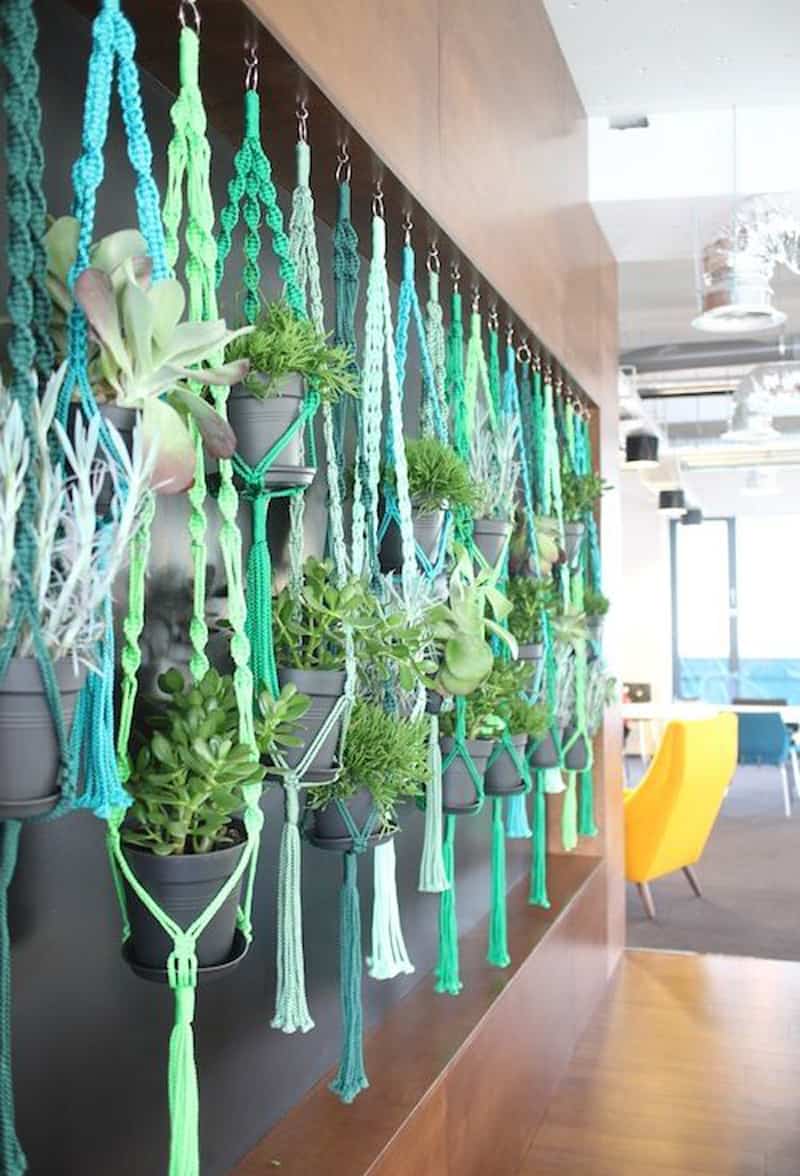
And, don't forget to give your hanging plants a creative touch! Check out designrulz for 20 macrame patterns for plant hangers.
1 Macrame Eye Candy-designrulz (18)

Wednesday, June 15, 2011

Best Beach Bag EVER!

Oh the joys of summer! There's really nothing that I don't love about summer...except maybe when we get snakes in the pool! I love the Georgia heat, and yes, even the humidity. I love, love, love the beach. I don't particularly care for the sand I often bring home in my beach bag. But, I have the perfect solution! I started making beach bags years ago using window screen. Just give it a little shake and the sand falls right through the holes in the screen. And, they are easy and inexpensive to make...

Supplies:
A roll of window screen. It comes in silver or black. I bought a 36" x 84" roll in silver for this bag.
1.5" or larger ribbon. I used 2 different ribbons, but you could use 1.
thread to match the ribbon
needle
pins
scissors
I paid $5.89 for this roll of screen at my local hardware store.
I rolled out the screen, measured and cut the screen at 16".
The screen is 36" wide, so when I fold the screen in half, I have a bag that will be 18" high by 16" wide.
Using those measurements, I can make 5 bags from one roll of screen.

Measure enough ribbon to fit just a little longer than the 2 top pieces of your bag.
Fold the ribbon in half along the 2 top pieces of the bag and pin it in place.

With the matching thread, stitch the ribbon in place.

When you have both top pieces finished, cut off the excess ribbon.

Pin the 2 finished top pieces together to hold in place while you stitch up the sides.

Measure the amount of ribbon you'd like for the sides and the handle of your bag. This will be one long piece of ribbon. Make it a little longer than you need...you can always cut it shorter when you get to the end.

Fold the end of the ribbon under so that you have a finished edge.

Fold the ribbon in half on one side of the bag and pin in place.

Using matching thread, stitch the ribbon in place. Repeat on the other side.

Finally, fill with a towel and sunscreen and head to the beach!

Here's a bag I made using black screen...

I have also made sachets using screen. I cut a 6" x 12" piece of screen and stitched the ribbon along 3 sides. I then filled the screen with rose hips and stitched the ribbon along the 4th side to close off the sachet. 


Wednesday, June 8, 2011

Chalkboard Paint


There are so many things you can do with chalkboard paint! Go in just about any boutique or antique store and you will see at least one silver platter with a chalkboard center. The picture above shows a variation of that idea. I painted a chalkboard in the center of one of my grandmother's old platters. I proudly keep it displayed on a nightstand in my guest room.

I painted a chalkboard on the wall as you go out to my garage to help me remember important dates. I used a level to get my lines straight, then taped off the area I wanted to paint. Once the chalkboard was complete, I painted branches with lemons around the chalkboard.

Here is another fun project I have done with chalkboard paint...

I took and old door and cut it into 3 sections. The door had 5 panels, so I ended up with 2 pieces that had 2 panels and 1 piece that only had one panel.
In this photo, I painted a chalkboard in the bottom section and painted a scene from downtown Senoia, Georgia in the top panel. This section of the door had the door knob which is the perfect thing to hang a box of chalk!

On this section of the door, I painted magnetic paint in the top panel and chalkboard paint in the bottom panel. I then covered the magnetic section and the rest of the door except for the chalkboard with vintage patterns using Mod Podge.

The section that had only one panel, I cut from the bottom of the door. This allowed for a larger area to paint something fun. I once again painted the panel with chalkboard paint. Then I painted the rest of the piece with red paint and then added the town motto, "Enjoy Senoia."
I added eye hooks and wire to the backs of these chalkboards so they could be hung easily.
Liz at Cydney's Alley in Senoia sold these pieces in her shop for me. Thank you Liz! If you are ever in the area, stop by and see her...she has great pieces in her shop. It's my favorite store in Senoia! Check her out at http://cydneysalley.bolgspot.com.

A quart of chalkboard paint goes a long way. So give it a try. 
Warning: You may become addicted to covering things with chalkboard paint!
Related Posts Plugin for WordPress, Blogger...