Thursday, September 29, 2011

Your Wreath Is NOT Just For Your Front Door

I just finished making a Fall wreath. 


If I hang it on my front door, I will never see it!
My guests will most likely never see it either because most of my visitors come to my side door.
If I hang it on my side door, my guests will pass by it on their way in, but I still will not get to enjoy it. I just pull in the garage and never go through the side door.
I want to enjoy my new wreath!!!
There is no rule that says a wreath has to hang on a door! So, I hung it in my family room from a knob on my antique cabinet...


Now I get to enjoy it every day! And, I like how where it hangs is a little unexpected.


Maybe I'll make another one... 

for the side door!


Sharing this at Southern Hospitality Door Decor Link Party.

Check out all the the great Fall projects at The DIY Showoff where they are hosting a Fall Festival link party!

Wednesday, September 28, 2011

Pumpkin Crate


I found this crate at the Goodwill for $2.92. I have been finding quite a lot of great small items there lately. I go in looking for a big project and come out with lots of little things!


The crate was in really good condition except for a couple of water spots. I gave it a wash of off white acrylic paint...I just used a wet paper towel and dipped it right into the paint and wiped it onto the crate.
Then I filled it with some straw packing material that I had (free) and some cute pumpkins that I have had for years (so I consider them free).
It turned out really cute and makes for an inexpensive Fall decor item!


Sunday, September 25, 2011

September Goodwill Treasure

I scored some great items on my recent trip to Goodwill.
Take a look...


I love this seashell mirror!
And, for $8 I couldn't pass it up.


I took it to my space at Earth Mamas. My plan was to leave it in the store for a couple of weeks, and if it didn't sell, I was going to paint it silver to give it a modern look. Somebody saved me the trouble of painting it...the mirror sold in just a couple of days! Oh, and I marked it up to $18 which I think was still a fantastic buy.

I also bought these 3 wooden plaques. I thought they were really cute. And once again, I thought if they didn't sell at Earth Mamas, then I could paint something else on them. They were $1.97 each! Imagine my surprise when I looked closer... on the back was the sticker from their original store. These plaques are from Pottery Barn Kids! They still had the price tag on them and they were originally $29 EACH!


Then there was this hideous tray. It, too, was $1.97. It had what looked like wallpaper on the inside and stickers stuck to the outside.


I gave it a couple of coats of paint and added a design to the center.


The frame design is from the Graphics Fairy website. I added the words to the center of the frame and printed it in the reverse image. I taped it down onto the tray, image side down, and rubbed with a pencil to transfer the design. I finished it off with a high gloss sealer.


A couple of weeks before this trip to the Goodwill, I found another tray at Goodwill for the same price. It was just as ugly. This one was blue with yet another wallpaper looking design in the tray...


I painted the tray orange and blended in a little black to give it an aged feel. Then using the same technique that I used on the other tray, I transfered a Halloween image also found on the Graphics Fairy website. Once my design was transferred, I painted over it with black acrylic paint. Once it was dry, I gave it a glossy finish.


Creepy, huh?

Don't pass up those great deals at Goodwill and other thrift stores. Underneath the ugliness just might be some treasure!

Versatile Blogger Award

I am so honored and excited that Iffy over at Stay At Home Nation awarded me with The Versatile Blogger Award! She has a great website and hosts some fantastic link parties! Check her out HERE when you get a chance. Thank you, Iffy!!!

As a recipient of The Versatile Blogger Award, there are 3 rules to follow...
1. Thank the person who awarded you.
2. Tell 7 things about yourself that your readers may not know.
3. Award 15 other bloggers with this award.

Once again, thank you, Iffy!
Now to the 7 things you may not know about me.
This was harder than I thought it would be!
1. I have been married for almost 23 years.
2. I have a degree in art.
3. After college, I was a designer for a large textile company. I designed patterns for carpet for hotels, restaurants, and casinos. I also designed area rugs for residential use. My daughter plans to major in apparel textiles.
4. I own a mural and faux finishing business called Off The Wall Murals.
5. I wanted to be an architect when I was young but never pursued it because I stink at math. My son, however, is great at math and is a Junior in college majoring in architecture.
6. I teach art at a Montessori school and also have homeschoolers that come to my house for art lessons.
7. I was an aunt 2 years before I was born! I touched on this subject a little in a post you can read HERE.

Now, for the 15 bloggers that I would like to pass this award on to...

Savannah Granny
Luxe Boulevard
Piorra Maison
Raising 4 Princesses
Ramblings Of A Southern Girl
The Kurtz Corner
Christine Marie Studio
Farmhouse Porch
Living A Creative Life at Peiwinkle Pass
Project Queen
Red Rose Alley
Shabby French Cottage
Southern Lovely
The Artsy Girl Connection
Primp

Congratulations to all the new recipients of the Versatile Blogger Award.
Please check out their sites! You'll be glad you did. Tell them I sent you!

Monday, September 19, 2011

The Witch Is In!

I recently came across a post at Mamie Jane's where she took an old piece of molding, and created altered art to make this wonderful piece for Halloween...

Isn't it great?
Visit her HERE to see how she did it and to see some of her other pieces!

Using Mamie Jane's piece as inspiration, I came up with my own version...


Here's how I did it...

Supplies:


Wooden block: Mine is 7.5" x 9"
acrylic paint in orange and black
paint brush
scrapbook paper: I used 3 coordinating pieces
pencil
an old photo: I got mine from Graphics Fairy
scissors
black ink pad
letter stamps
E6000 glue
glue stick

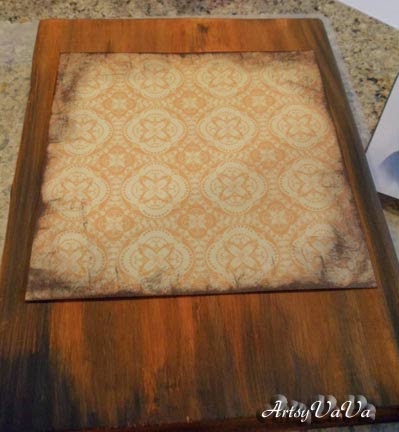
I started by painting my block of wood orange.


Next I added some black and blended it in with the orange to give it an old feel.


I printed out a picture of an old woman that I found on the Graphics Fairy website and then cut the picture out.


The scrapbook paper that I used for the witches hat was black with polka dots. I turned the paper over and sketched out a witches hat and cut it out.


Using one of the orange papers, I cut a band for the hat.


I used an ink pad to antique the edges of the orange band and then glued the band to the hat with a glue stick.


Using a piece of scrapbook paper that is larger than the photo, I used my ink pad to antique the paper. I liked the look of this paper because I thought it looked like an old wallpaper.


Once I finished inking the paper, I glued it onto the block using E6000.


I then glued the hat onto the "lady" using a glue stick and then glued her to the large piece of paper on the block.


I put her over to the side but you could center your picture if you'd like that better.

I cut a strip of the black polka dot paper and added it underneath the large paper using E6000.
I cut another strip of a coordinating orange paper and using my stamps, wrote out, "If the hat fits...wear it!"
I like to count out my letters to find which letter would be in the center. I then start with that letter and work my way out so that my phrase is centered.


I inked the paper after I wrote my phrase and attached it underneath the polka dot paper.


I cut a small strip of paper and with my stamps wrote out, "the witch is in". I then glued that piece onto a slightly larger piece of the polka dot paper.


I added those pieces at an angle over the large piece of paper.
 
 
I apologize if you know this lady! I'm sure she was a lovely person!

Here is another version...


Remember...if the hat fits, wear it!

Tuesday, September 13, 2011

The Well Mannered Pumpkins


I have a new favorite Fall decorating item!
For less than $2 each, I transformed dollar store pumpkins into works of art. And, it was super easy.
It's a little time consuming, so put on some music or turn on the tv and let the transformation begin.

What you'll need...

Dollar Store Styrofoam pumpkins.
Dollar Store Spanish Moss.
Pages from an old book torn into pieces.
ModPodge
White acrylic paint.(not pictured)
Paint brush
Xacto knife
A stick (not pictured)
E6000 glue (not pictured)

Directions:

Using the Xacto knife, cut the stem off of the pumpkin. You don't have to be neat with this because it will be covered up by the moss.


When I started adhering the paper to the pumpkin, you could see a little of the orange showing through, so I went back and painted the pumpkin white. Then, I started painting on ModPodge, sticking the paper on the pumpkin, and going back over the paper with another coat of ModPodge.


Here you can see how the orange shows through. So, I went back & painted the pumpkins white before adding the paper.  

Continue this process (after the pumpkin is painted white) until the entire pumpkin is covered.


I found sticks in my yard that would fit in the hole left from cutting off the stem of the pumpkin. I broke them so that they would reach to the bottom of the pumpkin and put a little E6000 at the end of the stick to stabilize it.


Finally, add a little E6000 around the top of the pumpkin and add some of the Spanish moss.


Oh...and the reason I call these The Well Mannered Pumpkins is because the pages that I used came out of an old Etiquette book.


Related Posts Plugin for WordPress, Blogger...