There are quite a few techniques for transferring images onto painted surfaces, but my favorite method is using the clear coat from the Dixie Belle Paint Company.
Here's how it works...
I started by having my son cut a 2 x 4 into square blocks. I sanded the edges and then stained the blocks with General Finishes Java Gel.
I wanted to add an aged look by layering paint, so I painted one side of the block with the color Limeade...
Then I randomly dabbed on a little Cobalt Blue..
and Honky Tonk Red...
I let it dry, then covered the painted side of the block with the color Sea Glass...
When the Sea Glass was dry, I sanded the block to reveal some of the other colors...
I printed out an image that I found at The Graphics Fairy. The image will bleed when transferred if printed using an ink jet printer, so I took what I printed to Staples to get a laser printed copy. If your image has words, you'll need to print it in reverse.
I cut as close as possible around the image...
I gave the image a generous coat of the Dixie Belle Clear Coat...
and then placed the image printed side down on the block...
I let the image dry.
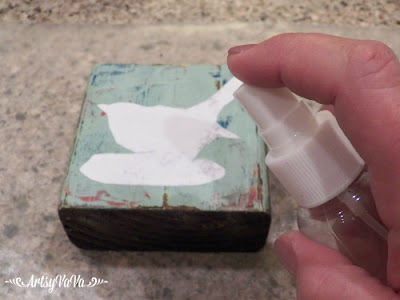
Then I sprayed it with water and gently began to rub the paper away to reveal the image...
A it dries, if there is a milky look to the image, spray it again and rub off more paper.
I finished it off by sealing it with the Dixie Belle Clear Coat.
Linking To:
Someday Crafts, Sew Much A Do, Ginger Snap Crafts, Creations By Kara, Rae Gun Ramblings, Ivy & Elephants, Seven Thirty Three, The Shabby Creek Cottage, Seven Alive, Bear Rabbit Bear Crafts, Made In A Day, Katherine's Corner, Redoux, Chic On a Shoestring, Simply Sweet Home, The Shabby Nest, Momnivore's Dilema, Somewhat Simple, Live Laugh Rowe, Have A Daily Cup Of Mrs Olson, Truly Lovely, The Cottage Market, Funky Junk Interiors, Tatertots & Jello, Blissful & Domestic, A Vision To Remember, Boogieboard Cottage, DIY Showoff, Craft-O-Maniac, Under The Table and Dreaming, Keeping It Simple, Homemaker On A Dime, I Should Be Mopping The Floor, The Dedicated House, Coastal Charm, Reasons To Skip The Housework, Sugar Bee Crafts, Nifty Thrifty Things, Cherished Bliss, A Bowl Full Of Lemons, Mad In Crafts, Flour Me With Love, Not Just A Housewife, Today's Creative Blog, Tip Junkie, Homework, Kammy's Korner, I Gotta Create, Thrifty 101, Domestically Speaking, C.R.A.F.T., The Answer Is Chocolate, Skip To My Lou, The Thrifty Home, Adorned From Above, Cedar Hill Ranch, Classy Clutter, Flutter Buster, Twelve O Eight, Nap Time Creations, The Shady Porch, JoJo And Eloise, Hope In Every Season, The Foley Fam, House Of Hoff, Our Home Away From Home, Living Well Spending Less, Remodelaholic, A Lived In Home, Flamingo Toes, VMG206, Finding Silver Pennies, Mad Cap Frenzy, Gingerly Made, Pink Heels Pink Truck, Minnette's Maze, Made To Be A Momma, Start At Home, Lil Mrs Tori, Homecoming, The Vintage Farmhouse, Pink Recipe Box, Sweet Haute, Table For Seven, Be Betsy, It Happens In A Blink, One Dog Woof, 4 You With Love, A Stroll Thru Life, A Bright And Beautiful Life, Crafty Goodies, Live Love Create, The Koenigs Create, Bloom Designs,French Country Cottage, Daisy Cottage Designs, Orchard Girls, Elizabeth Joan Designs, The Scoop, Stone Gable, Knick Of Time, Lou Lou Girls, Karen's Up On The Hill, Friday's Furniture Fix, DIY-Crush, Patina Paradise, Charm Bracelet Diva,


Love! Pinning this to my Image Transfer board to share.
ReplyDeleteI love what you did, thank you for sharing!!
ReplyDeleteWhat a wonderful piece. I've pinned it for a future project and will try it for sure. You certainly make it look easy. thanks for the info and steps to follow.
ReplyDeleteThis is lovely! I've tried different image transfer methods but this one seems like a winner to me! Thanks for sharing at Vintage Charm! Kathleen
ReplyDeleteThis is beautiful! It could be used in so many different ways. Thank you for sharing!
ReplyDeleteI just love it! Thank you for sharing the details of how you did it. I'm Pinning it to do soon.
ReplyDeleteLoving and sharing and pinning! The colors are great and the image one of my favorites.
ReplyDeleteI absolutely loved what you did by layering the paint, it's gorgeous! Thanks for sharing at Vintage Charm! xoKathleen
ReplyDeleteYou make it look so easy.
ReplyDeleteI pinned the idea and I am going to give it a try.
Thanks for the inspiration and for sharing at SYC.
Pinned and tweeted. Lovely!
ReplyDeleteVery sweet project. I don't believe I have ever seen that product, I will have to do a search. Thanks and chirp, chirp to your sweet little bird.
ReplyDeleteSandi
Another fabulous project! So I guess I just have to feature you again tonight!
ReplyDeleteWow I love the look you created with the different paint before the image was transferred. So cute!
ReplyDeleteVery creative and so pretty. The bird looks so lovely. Thank you for sharing the tutorial. I would like to invite you to share you lovely creation at our link party on Sunday's, Dishing It & Digging It.
ReplyDeleteQuite a unique way to get a transfer and it worked beautifully! I really love that all that color comes through where you distressed it. Too perfect!
ReplyDelete