Saturday, May 26, 2018

Trinkets From The Sea

 It’s that time of year when we start planning our beach vacations. Some of you may be at the beach for this Memorial Day weekend. Do you collect shells on your beach trips, then get home and don’t know what to do with them? This DIY trinket dish will make your larger shells both beautiful and useful. 

Here's what you'll need...
Seashell
Patterned Napkin or Tissue Paper
ModPodge
Paintbrush
Metallic Sharpie Marker
Adhesive Back Half Pearls

If you visit the Gulf Coast, chances are you won’t find a shell big enough for this project. However, you can order baking shells, like the ones I used here, online. They work perfectly for a trinket dish and are inexpensive.


When using a patterned napkin, separate the layers until you are left with just the top layer of paper. Coat the shell with ModPodge, then lay the napkin or tissue paper onto the shell. Use a paintbrush to gently press the paper into the grooves in the shell. Allow to dry, then add another coat of ModPodge to the shell. Let dry.


Gently tear the excess paper away from the shell.

Use a Sharpie marker to add a border to the shell. I used a metallic gold.


To make the trinket dish more stable, add three adhesive back half pearls (found in the scrapbook section of the craft store) to the bottom of the shell.


Linking To:
Coastal CharmGinger Snap CraftsCreations By KaraRae Gun RamblingsMade In A DayChic On a ShoestringSimply Sweet Home, The Shabby Nest Somewhat Simple,   Live Laugh Rowe, Have A Daily Cup Of Mrs OlsonThe Cottage Market,  Funky Junk InteriorsDIY Showoff, Craft-O-Maniac, Keeping It Simple, I Should Be Mopping The Floor, The Dedicated House Coastal Charm, Reasons To Skip The Housework, Sugar Bee Crafts,  Nifty Thrifty Things, Cherished BlissMad In Crafts, Flour Me With Love, Not Just A HousewifeToday's Creative Blog, Tip Junkie Homework,  I Gotta Create,   Domestically Speaking,  The Answer Is Chocolate, Skip To My LouThe Thrifty Home,Cedar Hill RanchFlutter BusterNap Time Creations, Hope In Every Season, The Foley FamOur Home Away From Home,  RemodelaholicFlamingo ToesVMG206 Finding Silver PenniesA Stroll Thru Life, French Country CottageThe Scoop, Stone Gable, Knick Of Time, Lou Lou GirlsOur Hopeful Home, The Painted Hinge, Savvy Southern Style, Tattertots & Jello, Yesterday On Tuesday, Rachel Teodoro, Worthing Court, Confessions Of A Plate Addict


Wednesday, May 9, 2018

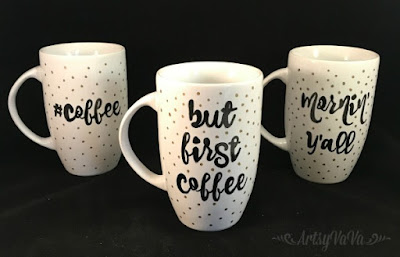
Coffee Mug DIY

 Most of us begin our day with a cup of coffee. Whether black, with cream, sugar, or even a little cinnamon, we each have our favorite. Why not create a coffee mug that is as unique to you as your own special blend?
 Supplies:
Mug
Computer
Printer
Printer Paper
Carbon Paper
Scissors
Pencil
Sharpie Oil Paint Pens
Tape
Rubbing Alcohol

Clean the coffee mug with rubbing alcohol to remove any dirt or oils.

Using your computer, design what you’d like the mug to say, then print what you create. Cut around the saying to make it fit easily onto the mug. Cut the carbon paper to the same or slightly larger size.

 Tape the carbon paper to the mug, then tape the paper with the saying over the carbon paper.


Trace over the letters with a sharp pencil. Lift the paper occasionally to make sure the letters are transferring properly.


 Once you have traced over all the letters, remove the papers and fill in the transferred letters with an oil based Sharpie Paint Pen. 


Use a different color paint pen to add dots to the mug. Use a Q-tip and nail polish remover to clean up any mistakes.


Place the mugs in a cold oven and set the temperature to 350 degrees. Once the oven reaches 350 degrees, let the mugs bake for 30 minutes. Turn the oven off and allow the mugs to cool completely in the oven. This will make the design more durable. However, the oil based Sharpie Paint Pens are water proof but not dishwasher safe, so hand washing is recommended.


Linking To:
Coastal CharmGinger Snap CraftsCreations By KaraRae Gun RamblingsMade In A DayChic On a ShoestringSimply Sweet Home, The Shabby Nest Somewhat Simple,   Live Laugh Rowe, Have A Daily Cup Of Mrs OlsonThe Cottage Market,  Funky Junk InteriorsDIY Showoff, Craft-O-Maniac, Keeping It Simple, I Should Be Mopping The Floor, The Dedicated House Coastal Charm, Reasons To Skip The Housework, Sugar Bee Crafts,  Nifty Thrifty Things, Cherished BlissMad In Crafts, Flour Me With Love, Not Just A HousewifeToday's Creative Blog, Tip Junkie Homework,  I Gotta Create,   Domestically Speaking,  The Answer Is Chocolate, Skip To My LouThe Thrifty Home,Cedar Hill RanchFlutter BusterNap Time Creations, Hope In Every Season, The Foley FamOur Home Away From Home,  RemodelaholicFlamingo ToesVMG206 Finding Silver PenniesA Stroll Thru Life, French Country CottageThe Scoop, Stone Gable, Knick Of Time, Lou Lou GirlsOur Hopeful Home, The Painted Hinge, Savvy Southern Style, Tattertots & Jello, Yesterday On Tuesday, Rachel Teodoro, Worthing Court, Confessions Of A Plate Addict


Related Posts Plugin for WordPress, Blogger...