Saturday, May 27, 2017

Painting With The Patina Collection

A young man recently hired me to paint a piece of furniture for his bedroom. He gave me several pictures for inspiration, as well as pictures of the pieces he's already using in the room. The inspiration pieces were mostly made with raw, reclaimed wood. All the inspiration pieces had a lot of texture. All were rustic yet modern.
I had quite the challenge to get this dark wood & brass piece transformed to something with the same feel as the inspiration pieces.

I decided that The Patina Collection from The Dixie Belle Paint Company would help me achieve the look I wanted.
When using the patina paints, you first have to paint the piece with Dixie Belle paint. This will act as a primer for the patina paint. I chose to use the color Chocolate, but it doesn't really matter what color you use. I just had plenty of the Chocolate in an already opened jar. So, I painted all the wood with Chocolate...

Once the Chocolate was dry, I painted on a coat of Bronze patina paint. The paint has metal in it so you have to shake it well so the metal is distributed throughout the paint.


Once the first coat of bronze patina paint was dry, I painted on the second coat. While the second coat is still wet is when you add the Patina Spray. The spray comes in blue and green. I used the blue spray for this project. And instead of spraying it on, I sprayed it into a bowl and brushed it on with a chip brush. 
 Because the piece was large and you have to add the spray while the second coat of patina paint is wet, I worked in sections. I started with the top, then did the upper half of the front, then the bottom half, then each side.

Then the magic starts to happen as the spray reacts with the paint.
 The reaction will start to happen quickly but can take 2 to 6 hours to finish.


Because the client used silver as the accents in his room, I changed the brass to silver using rub n buff.

Once the reaction of the patina was complete, I went over the entire piece, including the silver, with Dixie Belle's Grunge Glaze. I let the Grunge dry, then went over the entire piece with Black Glaze, also from Dixie Belle.

 I sealed the piece with Gator Hide from Dixie Belle which is a super durable and water repellent sealer.

The piece fits in beautifully in its new home. And, the customer is happy...so, I'm happy!


Linking To:
Coastal Charm,  Someday CraftsGinger Snap CraftsCreations By KaraRae Gun Ramblings,  Seven Thirty Three The Shabby Creek Cottage, Seven AliveMade In A DayChic On a ShoestringSimply Sweet Home, The Shabby Nest Somewhat Simple,   Live Laugh Rowe, Have A Daily Cup Of Mrs OlsonThe Cottage Market,  Funky Junk Interiors,  Tatertots & Jello,   Blissful & Domestic, A Vision To Remember  DIY Showoff, Craft-O-Maniac, Keeping It Simple, Homemaker On A Dime, I Should Be Mopping The Floor, The Dedicated House Coastal Charm, Reasons To Skip The Housework, Sugar Bee Crafts,  Nifty Thrifty Things, Cherished BlissMad In Crafts, Flour Me With Love, Not Just A HousewifeToday's Creative Blog, Tip Junkie Homework,  I Gotta CreateThrifty 101 Domestically Speaking,  The Answer Is Chocolate, Skip To My LouThe Thrifty Home,Cedar Hill RanchFlutter BusterNap Time Creations, Hope In Every Season, The Foley FamOur Home Away From Home,  RemodelaholicFlamingo ToesVMG206 Finding Silver PenniesA Stroll Thru LifeBloom Designs,French Country CottageThe Scoop, Stone Gable, Knick Of Time, Lou Lou GirlsDIY-Crush, Charm Bracelet Diva, Our Hopeful Home, The Painted Hinge, Savvy Southern Style


Tuesday, May 23, 2017

eShakti Review

 Recently, I needed a dress for an event. Being short and overweight makes for unpleasant shopping experiences. So, I turned to eShakti for a dress that is customized just for me! And the best part...they had just contacted me about sending me a sample to try. 
This is the dress I picked...
And, as I stated, eShakti customizes their dresses to your liking. You get to pick the length, the sleeve type, and, with some styles, the neckline. You also give your measurements.
It was going to be warm, so I picked a short sleeve. I wanted the dress to be long so I gave them my height and the dress was the perfect length. Being barely 5'1", long dresses usually need to be chopped off and hemmed. But, my eShakti dress fit me perfectly from the bustline, to the waistline, to the length! I received the dress in just under 3 weeks, which is great considering it was custom made just for me.

eShakti has a huge variety of styles from formal...


to casual...

to everything in between...


They even have some really fun prints!


And, eShakti isn't just for dresses. They have tops, pants, & skirts, too!


Whether you're easy or hard to fit, I think you'll love eShakti. With the huge selection of styles and products, there's something for everyone. And, the prices are reasonable, especially for a custom made dress! I will definitely order again!

I received product to sample from eShakti, but was not compensated monetarily. All opinions expressed are my own.

Wednesday, May 10, 2017

Cotton Pickin' Cute


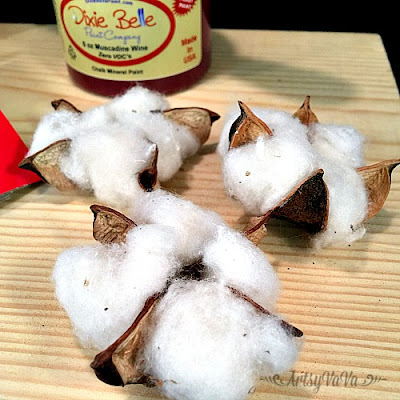
I don't know about other parts of the country, but here in the South, just about every shop you go in sells cotton. Cotton wreaths, cotton garland, cotton stems, individual cotton bolls, all are abundant!
For this project, I used 3 of the individual cotton bolls.

I used a 1 x 9 x 14 inch piece of wood to make the sign. And, since there's a Southern theme going on, I used the color Muscadine Wine from the Dixie Belle Paint Company to paint the wood.

While the paint was drying, I picked a font I wanted to use and printed out the words, cotton pickin' cute.

I used the side of a piece of chalk to rub over the back of the paper.

I taped the paper onto the board and used a pencil to trace around the letters to transfer them onto the board.


Then I used a small brush to fill in the letters.

An acrylic frame could be glued onto the board, but I used Velcro so the the frame can easily be change from portrait to landscape.


With the frame in the portrait position I decided where the cotton should be placed, then glued it on with E6000.


I think it turned out pretty cotton pickin' cute!


Linking To:
Coastal Charm,  Someday CraftsGinger Snap CraftsCreations By KaraRae Gun Ramblings,  Seven Thirty Three The Shabby Creek Cottage, Seven AliveMade In A DayChic On a ShoestringSimply Sweet Home, The Shabby Nest Somewhat Simple,   Live Laugh Rowe, Have A Daily Cup Of Mrs OlsonThe Cottage Market,  Funky Junk Interiors,  Tatertots & Jello,   Blissful & Domestic, A Vision To Remember  DIY Showoff, Craft-O-Maniac, Keeping It Simple, Homemaker On A Dime, I Should Be Mopping The Floor, The Dedicated House Coastal Charm, Reasons To Skip The Housework, Sugar Bee Crafts,  Nifty Thrifty Things, Cherished BlissMad In Crafts, Flour Me With Love, Not Just A HousewifeToday's Creative Blog, Tip Junkie Homework,  I Gotta CreateThrifty 101 Domestically Speaking,  The Answer Is Chocolate, Skip To My LouThe Thrifty Home,Cedar Hill RanchFlutter BusterNap Time Creations, Hope In Every Season, The Foley FamOur Home Away From Home,  RemodelaholicFlamingo ToesVMG206 Finding Silver PenniesA Stroll Thru LifeBloom Designs,French Country CottageThe Scoop, Stone Gable, Knick Of Time, Lou Lou GirlsDIY-Crush, Charm Bracelet Diva, Our Hopeful Home, The Painted Hinge


Monday, May 1, 2017

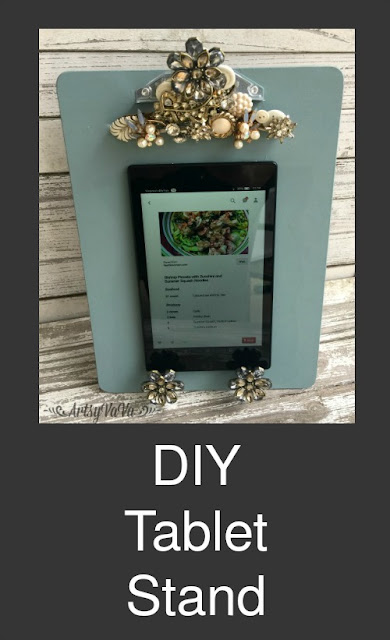
DIY Tablet Stand


Many of us have replaced our cookbooks with our tablet. After all, most of our recipes seem to be pinned in cyberspace! Get your tablet off the counter where it faces the possibility of meeting its demise with spills, by creating a beautiful stand. 

Supplies:
Clipboard
8 X 10 Tabletop Frame Back
Vintage Jewelry & Buttons
Drawer Pulls
Paint
Paintbrush
E6000 Glue

I painted the clipboard with 2 coats of the color Vintage Duck Egg from The Dixie Belle Paint Company.


To make the clipboard stand up, I glued the back of a tabletop frame to the back of the clipboard using E6000. 


I placed a book under the clip to make it lay flat. This will ensure that the jewelry and buttons don’t slide off while the glue dries. 


I used E6000 to attach the jewelry and buttons to the clip. . It’s best to work in stages, gluing a few pieces on at a time, and allowing them to dry before adding more. 

  I also added one of the drawer pulls to the clip since it had a vintage jewelry feel.


I removed the screws from the back of the drawer pulls & glued them along the bottom of the clipboard. I used my tablet as a guide to see how low they should be placed.


My tablet fits perfectly on the stand and is great for when I need a recipe!

When not holding my tablet, the stand can hold a grocery list or photo.


This will make a great gift for Mother's Day!


HOLD EVERYTHING!
It's time to get busy making this fun, versatile, project!


Pin It

Linking To:
Coastal Charm,  Someday CraftsGinger Snap CraftsCreations By KaraRae Gun Ramblings,  Seven Thirty Three The Shabby Creek Cottage, Seven AliveMade In A DayChic On a ShoestringSimply Sweet Home, The Shabby Nest Somewhat Simple,   Live Laugh Rowe, Have A Daily Cup Of Mrs OlsonThe Cottage Market,  Funky Junk Interiors,  Tatertots & Jello,   Blissful & Domestic, A Vision To Remember  DIY Showoff, Craft-O-Maniac, Keeping It Simple, Homemaker On A Dime, I Should Be Mopping The Floor, The Dedicated House Coastal Charm, Reasons To Skip The Housework, Sugar Bee Crafts,  Nifty Thrifty Things, Cherished BlissMad In Crafts, Flour Me With Love, Not Just A HousewifeToday's Creative Blog, Tip Junkie Homework,  I Gotta CreateThrifty 101 Domestically Speaking,  The Answer Is Chocolate, Skip To My LouThe Thrifty Home,Cedar Hill RanchFlutter BusterNap Time Creations, Hope In Every Season, The Foley FamOur Home Away From Home,  RemodelaholicFlamingo ToesVMG206 Finding Silver PenniesA Stroll Thru LifeBloom Designs,French Country CottageThe Scoop, Stone Gable, Knick Of Time, Lou Lou GirlsDIY-Crush, Charm Bracelet Diva, Our Hopeful Home, The Painted Hinge


Related Posts Plugin for WordPress, Blogger...