Showing posts with label pumpkin. Show all posts

Sunday, October 9, 2022

My Version Of The Popular Dollar Tree Pumpkin

 To whoever originally came up with this idea, you're a genius!

When I saw this project on Pinterest I had to give it a try. And, I knew that Dixie Belle Paint Company's new clay based paint, Terra, would be the perfect product to use.

Looking at it, it looks like old tin. But, surprisingly, this project uses a Dollar Tree cardboard pumpkin & a peel & stick plastic tile, also from the Dollar Tree.
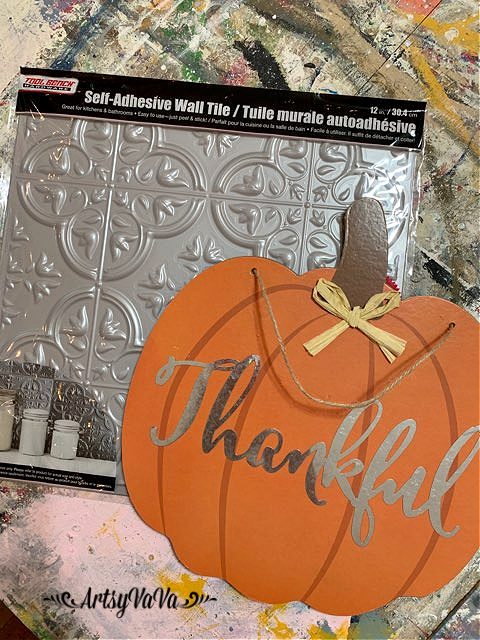

I removed the bow, then laid the pumpkin face down on the back side of the tile, traced around it, then cut it out.
The sticky part of the tile is only around the edges, so I glued the cut out tile onto the pumpkin base using E6000.

In the end, the pumpkin is white, but I wanted some color to show through. I used 3 colors of Terra to paint the pumpkin... Blue Agave, Cerulean Blue, & Galaxy.


Once dry, I sealed the paint with Terra Seal. Terra Clay Paint reactivates with water. So if I didn't seal it, it would blend with the white that I was painting over the top.


Once the Terra Seal was dry, I painted the pumpkin with the color, Prairie Dawn.


When the paint was dry, I used a damp rag to wipe away the paint from the raised areas on the tile, exposing the colors underneath.


To finish it off, I added a "messy" bow to the top of the pumpkin. I used different ribbons & a little Spanish moss.


 I added some wooden beads on twine to hang it.


This was such a fun project.
It really does look like tin. And, no one will know if you don't tell them!

Linking To:

Monday, November 16, 2020

Rust And The German Schmear

 I had never heard of the German schmear technique until I saw it on an episode of Fixer Upper. It creates a beautiful texture.

And, it's not just for a brick wall. It's great in other paint projects as well. And in this project I combined it not only with paint, but also with Dixie Belle Paint Company's Patina Collection.

I started with a wooden pumpkin from Signopoly...

I first stained the pumpkin with Dixie Belle's Voodoo Gel Stain using the color, Tobacco Road.
To create the first layer of the schmear, I add the paint color, Buttercream, to a block of wood, then drug it along the pumpkin.


I wanted to add some rust to my pumpkin, but I also wanted the rust to have some texture. So I mixed Sea Spray, a texture additive, in with the iron patina paint.
I used the same schmear technique with a block of wood to add the patina paint to the pumpkin.

While the patina paint was wet I sprayed it with the green patina spray. The spray creates a chemical reaction that when combined with the iron paint creates rust.

And, who doesn't love a little rust on their pumpkin?


Linking To:

Monday, September 21, 2020

Patchwork Pumpkin


I've used wood cutouts from Signopoly for a couple of years now. So, when they asked me recently to be a Signopoly Ambassador, I was thrilled. As an ambassador, they send me things to play around with. And, when they sent me this new pumpkin design, I immediately thought of a quilt.

I knew that I wanted some of the sections to be patterned. If you've followed me for awhile, then you know I love crafting with patterned paper napkins. When I found these napkins at Hobby Lobby, I knew they'd be perfect for this project.
I cut the napkins to fit in 6 of the sections.
I used ModPodge to adhere the napkins to the pumpkin then went over the top of the napkins with another coat of ModPodge. I let the excess part of the napkins hang over the edge until dry, then lightly sanded to remove the loose paper.
I used the colors Florida Orange, Rusty Nail, & Colonel Mustard from the Dixie Belle Paint Company to fill in the remaining sections of the pumpkin.

To define each section & make the pumpkin look more "finished" I added Dixie Belle's Best Dang Wax in the color brown. I filled the grooves with the dark wax using a stiff brush, then wiped it back. To make the wax easier to control, I first added clear wax to the pumpkin on the flat surfaces making sure to keep it out of the grooves.


Of all the Signopoly projects I've done over the years, I think this one is my absolute favorite!


Linking To:

Monday, November 11, 2019

DIY Thankful Sign

It's November, the month of Thanksgiving.
This DIY Thankful Sign is the perfect addition to your Fall decor.
And, it's super easy!

I used my Cricut Maker to cut out the word, thankful, in vinyl. If you don't have a Cricut you can buy vinyl letters at craft & office supply stores.
I added the vinyl to a wood sign board from Michael's.
 To help prevent the paint from seeping under the vinyl, I painted over it with the sealer Gator Hide from The Dixie Belle Paint Company. This creates a barrier over the edge of the vinyl so you will get crisp, perfect letters when you peel up the vinyl.
 Once the Gator Hide was dry, I used a makeup sponge to pounce over the vinyl using the Dixie Belle paint color, Fluff. Using a makeup sponge also helps prevent the paint from bleeding under the vinyl.
 I used a brush to paint the rest of the board.
 Once I had painted two coats of Fluff, I pulled off the vinyl.

 I added Mod Podge to a corner section of the board...
 then I placed a napkin with pretty pumpkins over the wet ModPodge. The pumpkins are perfect for Fall, but you could use other napkins to keep the sign up year round. The layers of the napkin need to be separated or the paper won't stick properly.
 I tore off the extra napkin that came over the edge of the board and added more ModPodge on top of the napkin.
 I glued a mini clothespin to the opposite corner of the board.
 I added a family photo from my recent trip to Italy.
 The clothespin makes it easy to change out the photo.

Happy Thanksgiving!


Linking To:
Related Posts Plugin for WordPress, Blogger...