Showing posts with label jewelry. Show all posts

Wednesday, January 17, 2018

Bullet Bling

Inspiration for crafts can be found everywhere! And, the gun range is no different. On a recent trip to the shooting range with my family, I couldn't resist filling up my pocket with a few spent bullets.
I didn't want a plain bullet hanging around my neck, so I found some filigree style jewelry findings, bent one of them around the bullet, then glued it on with E6000.


My son, drilled a hole in the end and I inserted a head pin.

 I held the head pin with needle nose pliers close to the bullet, then wrapped the pin to make a loop. I cut off the excess wire with wire cutters.


 I cut the loop & jump ring off of a charm I found at Michael's, then glued it into the open end of the bullet.


I added a jump ring to the loop that I formed with the head pin.

 I found a pretty beaded chain at Michael's & threaded it through the jump ring, then closed it with another jump ring.

 Got bullets? Make jewelry!


Linking To:
Coastal Charm, Ginger Snap Crafts,  Creations By Kara,  Rae Gun Ramblings, Made In A Day, Chic On a Shoestring,  Simply Sweet Home, The Shabby Nest,  Somewhat Simple,   Live Laugh Rowe, Have A Daily Cup Of Mrs Olson, The Cottage Market,  Funky Junk Interiors, DIY Showoff, Craft-O-Maniac, Keeping It Simple, I Should Be Mopping The Floor, The Dedicated House,   Coastal Charm, Reasons To Skip The Housework, Sugar Bee Crafts,  Nifty Thrifty Things, Cherished Bliss, Mad In Crafts, Flour Me With Love, Not Just A Housewife,  Today's Creative Blog, Tip Junkie,  Homework,  I Gotta Create,  Thrifty 101,  Domestically Speaking,  The Answer Is Chocolate, Skip To My Lou, The Thrifty Home,Cedar Hill Ranch, Flutter Buster, Nap Time Creations, Hope In Every Season, The Foley Fam, Our Home Away From Home,  Remodelaholic, Flamingo Toes,  VMG206,  Finding Silver Pennies, A Stroll Thru Life, French Country Cottage, The Scoop, Stone Gable, Knick Of Time, Lou Lou Girls, Our Hopeful Home, The Painted Hinge, Savvy Southern Style, Tattertots & Jello, Yesterday On Tuesday, Rachel Teodoro


Wednesday, October 25, 2017

Leather & Lace

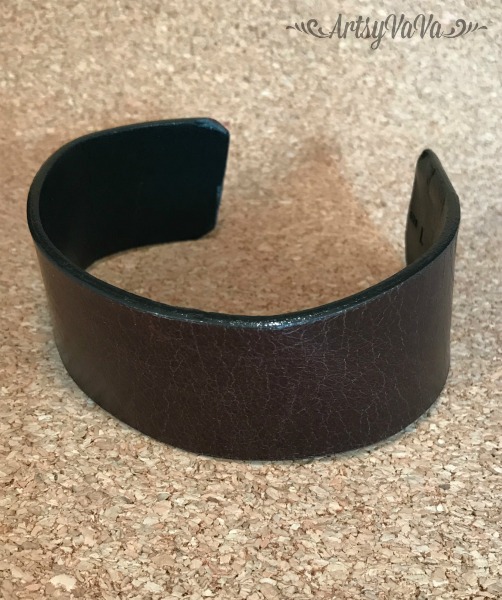
When we think of leather, we think of strength and durability. When we think of lace, we think of delicate beauty. When combined, the two are a perfect match. Recycling an old leather belt, in combination with lace ribbon, into a cuff bracelet will add a touch of BOHO Chic style to your wardrobe.

Supplies:
Leather Belt
Lace Ribbon
Leather Snips
Leather Punch
Metal Snaps
Scissors
E6000 Glue
Hammer


Genuine leather is needed for this project. If the belt is not real leather, it will be made of layers and will separate when cut.


Wrap the belt around your wrist to determine how long to cut the leather. Allow the leather to overlap one inch. Once the belt is cut to the proper length, trim the edges into a curve.


Use a leather punch to make holes in each end of the leather band.


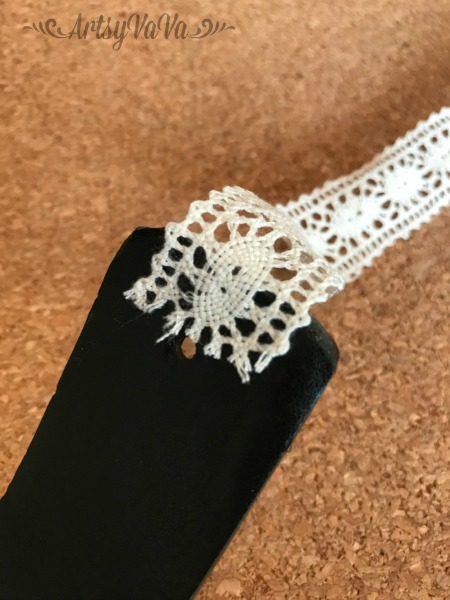
Cut a piece of lace ribbon approximately one inch longer than the leather. Use E6000 to glue the lace to the leather.


Place the metal snaps through the holes in the leather. You may need to use the end of scissors to make a hole in the lace for the snap to pass through. Metal snaps for leather are found in the craft store in kits and are inexpensive and easy to use.


There are so many options for creating cuff bracelets with belts. You can leave them plain, leave the buckle on, or add a button...
You can typically make 3 cuffs from one belt.
For this colorful vintage belt, I added a metal flower to the cuff using E6000.
Start hitting the thrift stores & stock up on leather belts because this craft  can become an addiction!

Linking To:
Coastal Charm,  Someday Crafts, Ginger Snap Crafts,  Creations By Kara,  Rae Gun Ramblings,  The Shabby Creek Cottage,  Made In A Day, Chic On a Shoestring,  Simply Sweet Home, The Shabby Nest,  Somewhat Simple,   Live Laugh Rowe, Have A Daily Cup Of Mrs Olson, The Cottage Market,  Funky Junk Interiors,   Blissful & Domestic, A Vision To Remember  DIY Showoff, Craft-O-Maniac, Keeping It Simple, Homemaker On A Dime, I Should Be Mopping The Floor, The Dedicated House,   Coastal Charm, Reasons To Skip The Housework, Sugar Bee Crafts,  Nifty Thrifty Things, Cherished Bliss, Mad In Crafts, Flour Me With Love, Not Just A Housewife,  Today's Creative Blog, Tip Junkie,  Homework,  I Gotta Create,  Thrifty 101,  Domestically Speaking,  The Answer Is Chocolate, Skip To My Lou, The Thrifty Home,Cedar Hill Ranch, Flutter Buster, Nap Time Creations, Hope In Every Season, The Foley Fam, Our Home Away From Home,  Remodelaholic, Flamingo Toes,  VMG206,  Finding Silver Pennies, A Stroll Thru Life, French Country Cottage, The Scoop, Stone Gable, Knick Of Time, Lou Lou Girls, DIY-Crush, Our Hopeful Home, The Painted Hinge, Savvy Southern Style, Tattertots & Jello, Yesterday On Tuesday, Rachel Teodoro


Monday, May 1, 2017

DIY Tablet Stand


Many of us have replaced our cookbooks with our tablet. After all, most of our recipes seem to be pinned in cyberspace! Get your tablet off the counter where it faces the possibility of meeting its demise with spills, by creating a beautiful stand. 

Supplies:
Clipboard
8 X 10 Tabletop Frame Back
Vintage Jewelry & Buttons
Drawer Pulls
Paint
Paintbrush
E6000 Glue

I painted the clipboard with 2 coats of the color Vintage Duck Egg from The Dixie Belle Paint Company.


To make the clipboard stand up, I glued the back of a tabletop frame to the back of the clipboard using E6000. 


I placed a book under the clip to make it lay flat. This will ensure that the jewelry and buttons don’t slide off while the glue dries. 


I used E6000 to attach the jewelry and buttons to the clip. . It’s best to work in stages, gluing a few pieces on at a time, and allowing them to dry before adding more. 

  I also added one of the drawer pulls to the clip since it had a vintage jewelry feel.


I removed the screws from the back of the drawer pulls & glued them along the bottom of the clipboard. I used my tablet as a guide to see how low they should be placed.


My tablet fits perfectly on the stand and is great for when I need a recipe!

When not holding my tablet, the stand can hold a grocery list or photo.


This will make a great gift for Mother's Day!


HOLD EVERYTHING!
It's time to get busy making this fun, versatile, project!


Pin It

Linking To:
Coastal Charm,  Someday Crafts, Ginger Snap Crafts,  Creations By Kara,  Rae Gun Ramblings,  Seven Thirty Three,  The Shabby Creek Cottage, Seven Alive, Made In A Day, Chic On a Shoestring,  Simply Sweet Home, The Shabby Nest,  Somewhat Simple,   Live Laugh Rowe, Have A Daily Cup Of Mrs Olson, The Cottage Market,  Funky Junk Interiors,  Tatertots & Jello,   Blissful & Domestic, A Vision To Remember  DIY Showoff, Craft-O-Maniac, Keeping It Simple, Homemaker On A Dime, I Should Be Mopping The Floor, The Dedicated House,   Coastal Charm, Reasons To Skip The Housework, Sugar Bee Crafts,  Nifty Thrifty Things, Cherished Bliss, Mad In Crafts, Flour Me With Love, Not Just A Housewife,  Today's Creative Blog, Tip Junkie,  Homework,  I Gotta Create,  Thrifty 101,  Domestically Speaking,  The Answer Is Chocolate, Skip To My Lou, The Thrifty Home,Cedar Hill Ranch, Flutter Buster, Nap Time Creations, Hope In Every Season, The Foley Fam, Our Home Away From Home,  Remodelaholic, Flamingo Toes,  VMG206,  Finding Silver Pennies, A Stroll Thru Life, Bloom Designs,French Country Cottage, The Scoop, Stone Gable, Knick Of Time, Lou Lou Girls, DIY-Crush, Charm Bracelet Diva, Our Hopeful Home, The Painted Hinge


Related Posts Plugin for WordPress, Blogger...