Showing posts with label birds. Show all posts

Friday, November 22, 2019

Rusty Nail Simplicity

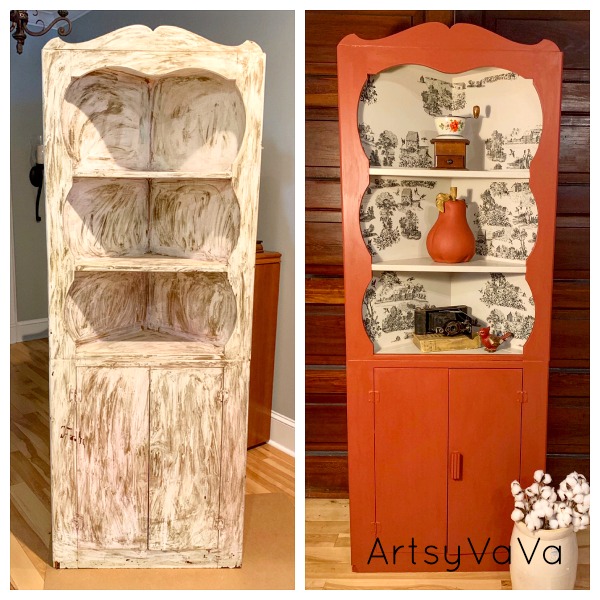
I have come across quite a few corner cabinets like this. There must have been a time when a kit or the plans were available. This one came from a lady around 70 who said her father made it.
 It had a terrible finish on it!
I've said before that there are certain pieces that as soon as I see them I know exactly what I want to do for their makeover. This was one of those pieces.
I could envision it with Rusty Nail and Sawmill Gravy from the Dixie Belle Paint Company, and the re*design with Prima transfer, Simplicity.
 I wasn't expecting bleed through on this piece, but whatever was used for that swishy (is that a word?) finish caused my Sawmill Gravy to turn pink. So, I coated the piece with Dixie Belle's BOSS. BOSS prevents bleed through and odors.

Then I painted the inside of the piece with more Sawmill Gravy and added the Simplicity transfer.
 I painted the rest of the cabinet with Rusty Nail.

 What a difference!
Linking To:

Tuesday, February 12, 2019

DIY Phone Case

 Can't find a phone case you like? Make your own!
This is a simple way to transform a plain phone case into something beautiful.

I have a package of rub on image transfers called, Parisian Butterflies, from Re*design With Prima. The package contains one sheet with butterflies, one sheet with birds & twigs, & two sheets with writing.
 I picked out a section of writing and cut it to fit on the case.
 I removed the white backing, placed the design on the phone case, & rubbed over the plastic sheet with the stick that comes in the package.
 Then I peeled up the plastic top sheet. I went very slow to make sure all the design  had stuck to the case. If it started to peel up, I laid the sheet back down and rubbed until the design adhered.
 I cut out a pretty bird from the sheet that had birds & twigs and added it to the case.

 I sealed the case with 2 coats of Mod Podge and then a coat of Dixie Belle's Gator Hide.
Here are a few coasters I made using the same technique with transfers from the same package. 
The coasters are stone and I gave them a coat of Slick Stick and a coat of white paint, both from Dixie Belle, before adding the transfers.


There are plenty more birds, butterflies, & writing left in the package. I just have to decide what I want to transform next!


Linking To:
Ginger Snap CraftsCreations By KaraRae Gun RamblingsChic On a ShoestringSimply Sweet HomeHave A Daily Cup Of Mrs OlsonThe Cottage Market,  Funky Junk InteriorsDIY Showoff, Craft-O-Maniac, Keeping It Simple, I Should Be Mopping The Floor, The Dedicated House Coastal CharmSugar Bee CraftsFlour Me With Love,  Today's Creative Blog, Tip Junkie Homework,  I Gotta Create,   Domestically Speaking,  The Answer Is Chocolate, Skip To My LouThe Thrifty Home,Cedar Hill RanchFlutter BusterNap Time Creations, Hope In Every Season, The Foley FamOur Home Away From Home,  RemodelaholicFlamingo Toes Finding Silver PenniesA Stroll Thru Life, French Country CottageThe Scoop, Stone Gable, Knick Of Time, Lou Lou GirlsOur Hopeful Home, My Thrift Store AddictionThe Painted Hinge, Savvy Southern Style, Tattertots & Jello, Yesterday On Tuesday, Rachel Teodoro, Worthing Court, Confessions Of A Plate Addict, My Uncommon Slice Of Suburbia, Dabbling And Decorating


Tuesday, June 26, 2018

Two For One DIY

Today I'm sharing 2 DIY techniques in 1 post...
Crackle & Image Transfer.

 I started with a frame from Michael's...

 I applied Crackle from the Dixie Belle Paint Company directly onto the frame. This will allow the black to show through the cracks once I apply the paint. Crackle can be tricky. The key is to not overwork it. Don't brush back and forth!


 I let the Crackle dry completely, then painted over it with the Dixie Belle color, Apricot. It's the same when applying paint over crackle, don't overwork it! The paint starts to crack quickly so if you go back and forth over it, you will cover up the cracks.


I was originally going to do an image transfer on wood and add it to the frame, but decided to do it on the glass that came with the frame. I first gave the glass 2 coats of Slick Stick. It helps the paint stick to any really slick surface.

 You need to wait at least an hour between coats of Slick Stick. I also waited an hour before adding the paint color, Fluff. 

 I found a beautiful image of birds on the Graphics Fairy website, sized it to fit on the glass, then printed it out. I took it to my local office supply store and made copies on their laser printer. Ink jet images will bleed and you won't get a clear image. 

 I cut around the image, then added Dixie Belle Clear Coat to the printed side of the image, as well as to the glass.

 I pressed the paper, image side down onto the glass and let it sit overnight to ensure that it was completely dry before the next step.

 The next day I sprayed the paper with water and let it sit for a minute to soak into the paper.

 I then started to gently rub the paper. It will pull up but leave the image.

As it dries, the image may appear cloudy. If this happens, just spray with more water and continue the process.

If some of the image pulls up, it just adds to the vintage charm.

 I sealed the image with another coat of the Clear Coat, then added Van Dyke Glaze to the image on the glass and to the frame.


 I put the glass back in the frame and was so happy with it that I made 5 more!


Linking To:
Coastal CharmGinger Snap CraftsCreations By KaraRae Gun RamblingsMade In A DayChic On a ShoestringSimply Sweet Home, The Shabby Nest Somewhat Simple,   Live Laugh Rowe, Have A Daily Cup Of Mrs OlsonThe Cottage Market,  Funky Junk InteriorsDIY Showoff, Craft-O-Maniac, Keeping It Simple, I Should Be Mopping The Floor, The Dedicated House Coastal Charm, Reasons To Skip The Housework, Sugar Bee Crafts,  Nifty Thrifty Things, Cherished BlissMad In Crafts, Flour Me With Love, Not Just A HousewifeToday's Creative Blog, Tip Junkie Homework,  I Gotta Create,   Domestically Speaking,  The Answer Is Chocolate, Skip To My LouThe Thrifty Home,Cedar Hill RanchFlutter BusterNap Time Creations, Hope In Every Season, The Foley FamOur Home Away From Home,  RemodelaholicFlamingo ToesVMG206 Finding Silver PenniesA Stroll Thru Life, French Country CottageThe Scoop, Stone Gable, Knick Of Time, Lou Lou GirlsOur Hopeful Home, The Painted Hinge, Savvy Southern Style, Tattertots & Jello, Yesterday On Tuesday, Rachel Teodoro, Worthing Court, Confessions Of A Plate Addict, My Uncommon Slice Of Suburbia


Saturday, March 17, 2018

For The Birds

Spring is here, and birds will be busy building their nests. Give them a helping hand by providing things that they can use while nesting. And, while you’re helping out our feathered friends, you’ll also be adding something pretty to your yard.
Supplies:
Wire Whisk
Moss
Burlap or Other Natural Fiber Fabric
Straw
Twigs
Dead Leaves
Loose Wool or Cotton (I ordered wool from www.myfavoritesheep.com)
Twine
Beads
Note: Do not use drier lent because it may contain chemicals that are harmful to birds. Also, refrain from using yarn or string, as they may get tangled around the birds and cause harm.

 Pull apart the wire of the whisk just wide enough to insert the moss.


 Layer the straw, twigs, leaves, fabric strips, and wool over the moss.


Tie a piece of twine to the end of the whisk. Add beads to the twine then tie the whisk around a branch. Wrap excess twine around the branch and tie it to secure.


 Some birds, like Goldfinches, build their nests as late as June, so continue to add elements to the whisk as the birds empty it out.


Linking To:
Coastal CharmGinger Snap CraftsCreations By KaraRae Gun RamblingsMade In A DayChic On a ShoestringSimply Sweet Home, The Shabby Nest Somewhat Simple,   Live Laugh Rowe, Have A Daily Cup Of Mrs OlsonThe Cottage Market,  Funky Junk InteriorsDIY Showoff, Craft-O-Maniac, Keeping It Simple, I Should Be Mopping The Floor, The Dedicated House Coastal Charm, Reasons To Skip The Housework, Sugar Bee Crafts,  Nifty Thrifty Things, Cherished BlissMad In Crafts, Flour Me With Love, Not Just A HousewifeToday's Creative Blog, Tip Junkie Homework,  I Gotta Create,   Domestically Speaking,  The Answer Is Chocolate, Skip To My LouThe Thrifty Home,Cedar Hill RanchFlutter BusterNap Time Creations, Hope In Every Season, The Foley FamOur Home Away From Home,  RemodelaholicFlamingo ToesVMG206 Finding Silver PenniesA Stroll Thru Life, French Country CottageThe Scoop, Stone Gable, Knick Of Time, Lou Lou GirlsOur Hopeful Home, The Painted Hinge, Savvy Southern Style, Tattertots & Jello, Yesterday On Tuesday, Rachel Teodoro, Worthing Court, Confessions Of A Plate Addict


Related Posts Plugin for WordPress, Blogger...