Pages

Friday, December 30, 2011

My Top 10 Projects of 2011

Here are my Top 10 projects of 2011.
This Top 10 list is based on the number of comments I received for each post from my readers. Therefore, this is YOUR Top 10!

NUMBER ONE:


NUMBER TWO:

Book Page Covered Pumpkins

NUMBER THREE:

The Welcome Window

NUMBER FOUR:

Notebook Paper Canvas

NUMBER FIVE:

Life Is Too Short To Fold Fitted Sheets


NUMBER SIX:


Burlap Christmas Trees


NUMBER SEVEN:


Joy Wood Blocks


NUMBER EIGHT:


Vintage Framed Paper Dolls


NUMBER NINE:


Chalk Paint Chair


NUMBER TEN:


Little Girl's Room Mural


Thank you to everyone who follows Artsy VaVa!
I appreciate your comments and love hearing from you.
Have a Happy New Year!!!


Thursday, December 29, 2011

The PEN Ready Project from Olympus

This post is sponsored by Olympus.
Photography: n.  the art or process of recording images permanently and visibly by the chemical action of light on sensitive material, producing prints, slides or film.

That was the how photography was defined in 1993.
Today's definition reads:
: the art or process of producing images by the action of radiant energy and especially light on a sensitive surface (as film or a CCD chip) 

Although the definition of photography may change over the years, the romance of photography does not. Whether it be a memory we want to capture, a loved one's smile, or the simple beauty found in nature, there is something so satisfying about recording the moments of our lives.
It's amazing how easy it is to capture these images today. Anyone can be a photographer when given the right camera.

The folks at Olympus surprised over 1,000 people with a new Olympus PEN® E-PM1 to show how easy it is for anyone to take amazing pictures, . It's  part of The PEN Ready Project—more than 1,000 cameras, over 1,000 people, 6 cities.  To see what they shot, go to http://penready.com.
  Take a look at this fun video to see how shocked the people were to receive a free camera and to see some of the shots they took...
I for one am inspired! 


Monday, December 26, 2011

Better Late Than Never

Well, Santa has come and gone and I am just now getting around to posting some pictures of my Christmas decor! Oh well, better late than never.

I have a large vintage looking Santa that stands on my mantel...
I also have a vintage looking garland that I add to the mantel along with real vintage toys...


I have built ins on each side of the fireplace.
On this side I used old Coca Cola crates, an old lantern & license plate. I also added this cute hatbox. It's not old...just made to look that way.
On this same built in, I used my mother's old tea pitcher, a silver tray with a vinyl "B" and some candles. These items usually sit on my mantel.
On the other built in, I put another hatbox. This one really is old! It's an old Stetson Cowboy hat box. I filled it with some branches cut from my tree.

On the other side of this built in, I kept it simple by just adding a deer embroidery hoop that I made to what was already there. The wooden pieces are old cigar frames. I saw the embroidery hoop tutorial at the Blue Robin Cottage. 
My favorite thing that I decorate with every year is this...
It is the stocking that my mother made for me when I was a little girl. She cut out the letters by hand! I had my friend, Kimbo, frame it for me years ago and I proudly hang it in a prominent spot every year! 

I hope you all had a wonderful Christmas!

I'm closing with a painting that I did a few years ago. The sentiment is so true! Try to remember it all year, not just at Christmas...


Thursday, December 22, 2011

Bo

I just had to share this cute picture of my puppy, Bo. Actually, he's 13 years old, but we still call him "the puppy." Every year he gets a candy cane dog treat and it takes him about 3 weeks to eat it! That is, if he eats it at all... he really just likes to carry it around.
 You may be wondering what breed of dog Bo is...
He's a mutt. Perhaps the cutest mutt on the planet!
Anyone care to venture a guess at the 3 breeds that make up this cutie? I'd love to hear your guesses!

Wednesday, December 21, 2011

Christmas Peacock Porch

I have written before about the peacocks that live on the farm across the road from my house. We don't see them very often, but we ALWAYS hear them! They are quite noisy! Luckily, we can't hear them when we are inside. If we could, then we would probably go nuts!
In honor of the peacocks, I added some peacock feathers to my front porch Christmas decor...

I already had the rain boots with a peacock feather design. I put some floral foam inside the boots, added some branches that we cut from the bottom of our Christmas tree, and stuck in a few feathers.

I have an artificial garland that I use around my door and I added a few of the feathers to it, too.


I put a Christmas tree inside of an old toy box that is missing its lid...

I wrapped the base of the tree with burlap and added a sign I made using old barn wood. The snow on the sign is made using SnowTex. I painted the letters with acrylic paint.
I chose not to add peacock feathers to the tree. I didn't want to go too peacock crazy!
Pin It

Tuesday, December 20, 2011

Christmas Spool Garland

Today I am so excited to be hosting over at The Kurtz Korner.
Thanks, Audra, for having me! Please check out Audra's blog and become one of her Followers so you can keep up with all the great things happening at The Kurtz Korner!


Here's what I'm sharing at The Kurtz Korner...

I recently created this vintage inspired spool garland...
Here's how I did it...
 I started out covering wooden spools that I bought at the craft store with sheet music that I printed from the Graphics Fairy website.
I used a damp rag to apply red acrylic paint to wooden beads. I used this technique to give the beads a marbled look rather than having complete coverage...


Next, I cut a long piece of green jute and tied a loop in one end...
I wrapped the other end of jute with tape to make it easier to thread through the beads and spools...

I tied a knot about 8 inches away from the end of the jute and added a bead, a spool, and another bead and then tied another knot to hold it all in place...

I threaded on a rusty metal star ornament and tied it in place about 6 inches away from the last bead...


I continued this process alternating the beads and spool with the stars until I had about a 6 foot garland.


I love the vintage, yet rustic feel of this garland...

This was an easy and inexpensive garland that will make a big impact on my Christmas tree!


Friday, December 16, 2011

Show Off & Win $$$ at PennySaverUSA.com

There is a great contest going on until the end of December at http://www.pennysaverusa.com where you can win $250 or $300 for MOGASA users (download the ultimate garage sale app here). Just show your holiday spirit by sending a photo of a seasonal craft you’ve created before December 29, 2011, and you’ll be entered in MOGASA’s and PennySaverUSA’s Craftmas Contest. I submitted my Christmas Spoon Curtains! If I win, I am buying a new camera!!!
A panel of PennySaverUSA judges will select the winning submission from the entries received on December 30th. There’s no fee to enter and the contest is open to anyone 18 years or older within the United States, excluding Alaska and Hawaii. 
 I can't wait to see who wins! Will it be you? Good luck!!!

Tuesday, December 13, 2011

Spoon Curtains!???

A few weeks ago, I wrote about these spoons I found at the Goodwill. There were 100 brand new spoons in the bag! You can read more about that here.


Back in the summer, I showed how I turned iced tea spoons into plant markers. You can read that post here for the tutorial...


With my new spoons, I decided to make a Christmas curtain. 


I started by tracing around the spoons so I would know how big to draw my design...


I drew my designs using markers...


Then I cut the paper in sections to be able to tear the paper easily...


I tore enough paper away so that the design would fit inside the spoon and no pencil marks were left.

I used an ink pad to age the paper...


I put a drop of Diamond Glaze on the spoon and attached the paper. I rubbed out all of the bubbles and wrinkles, smoothing the glaze on top of the paper to seal it and give it a glossy finish. You could use ModPodge for this, also.


I had my husband drill holes in the end of each spoon so that I could add a jump ring...


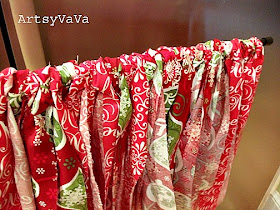
For the curtain, I bought 3 coordinating fabrics and cut them into strips. They are about 2 inches wide and 20 inches long, but I didn't measure so the size varies slightly.


 I tied the strips onto a tension rod...


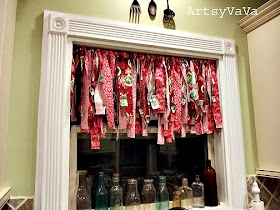
I then cut thin strips of my fabric and tied it to the jump rings...

I tied my spoons onto the rod varying the height of the spoons so they would hang at different levels.


I hung the curtain in my kitchen, of course. 
It makes a festive addition to my Christmas decor!